Sunday, October 9, 2011

Pender Harbour Weekend

In flight

It's been about a week since I've gotten back and dudes--I am SO SAD to be back from vacation. I had such an awesome time and man is it hard coming back to reality. (Also I came home and found approximately 30 pears and about 20 apples in my fridge from the CSA share my brother picked up for me--egad!! More sauce on the agenda....) I've got a couple more posts about the trip coming but for this one I wanted to focus on the weekend we spent at our friends' marina. It can be summed up thusly:OMG SEALS!!!

Controls

Although, I'm getting ahead of myself. We took a floatplane up to Sechelt (so much faster than the ferry) and it was super fun. As you can tell from the photo above, it is a very small plane (a 6 seater!) and the pilot is right there with you. And the view is amazing. And before you know it, you're coming in for landing:

Coming in for landing

Airport

And here's the airport! By airport, I mean a series of docks, and a pub. It's pretty sweet actually, you can land, refuel your plane, get a beer, eat some boiled shrimp...not bad. We had to wait around a while for our friend to come collect us, but eventually he arrived and we drove to breakfast.

Boater's Breakfast at Laverne's

If you ever get to Pender Harbour, a must-do is to go eat at Laverne's. That's the boater's breakfast above (I exercise a little restraint and went with a breakfast that only had bacon instead of bacon AND sausage!) and it's just the thing when you've been awake since the crack of dawn and need fuel for a kayak trip. (And after your kayak trip, you can go back for a burger and delicious fries, and a shake. Mmm, shake.)

Salt and Pepper Troops

Plus there are quirky things all over the restaurant, like this army of salt and pepper shakers.

DSCF0484

And here I am, in a kayak for the first time ever!! It was so much fun. It took me a little while to get the hang of paddling (I kept bashing my knuckles against the side of the kayak) but once I did it was tremendously fun. We paddled from the marina to the mouth of the harbour (a lot further than it sounds--a good solid hour or so of paddling!) because I was promised real live wild seals!

seals!!!!!!

And seals there were! (These were taken on a second trip the next day, when we went back in a motorboat; I didn't want to take the expensive camera in the kayak, I mean, what if I dropped it!)

Sunbathing seals

They were just chilling on these floating logs, a whole group of them! It was amazing! I'm frankly surprised I didn't tip my kayak over in excitement. IT WAS SO COOL!!! FREAKING SEALS!!!! (The photo at the top of the post was also taken during our kayak trip--it's a heron flying away.)

Nachos

Ahem. Okay, I'm calm again. Anyway, all that paddling worked up an appetite and thirst so we adjourned to the bar for some beer and the biggest plate of nachos ever (and this is the small portion!) and some interesting conversation with other bar patrons (our friend now has lots of business ideas for his boat). Then it was time to hop in his little motorboat and head over to the nearby town for more food to cook onboard. You can click here to see a short video of the trip over; you can hear me laughing maniacally and mumbling something unintelligible. Dinner was short ribs, which I did not take a picture of because it was too dark!

Morning on the Cape Pine

We woke up on Sunday to rain! I guess that was to be expected, because despite the name Sunshine Coast, there's definitely a rainy season (which seems to last, you know, 9 months). And there were forecasts of a major storm moving in, so that put a damper on my plans to go take another kayak trip. We settled for breakfast (an entire package of bacon! haha) and coffee and I don't know why but coffee tastes better on the boat.

DSC_1407

It was kind of a weird day, weather-wise! And by the time we were getting ready to go and catch the ferry back, the sky had cleared up and it turned gorgeous, if also still windy. (We took another trip over to see the seals, too! Yay!) I'm told we passed a black bear on the way to the ferry but I think I might have dozed off at that point. An excellent time, all around.

More photos from the weekend are here, in case this post wasn't already long enough!

Friday, September 16, 2011

Be right back...

Apple Cake

I'm taking a little vacation. If I feel motivated, I may put up a post or two but in the meantime, I leave you with this delicious apple cake, which is part of my endeavor to use up as much of my produce as possible. (The other 20 apples were turned into applesauce--pears became pear sauce. You get the picture.)

With any luck I won't come home to any sentient life forms in my refrigerator...Have a great weekend, everyone! If you're in NYC this weekend, you might consider checking out the Dumpling Festival at Sara D. Roosevelt park on Saturday. I am very sad that I will miss the dumpling eating contest (I'm so gonna enter next year).

Sunday, September 11, 2011

Mooncakes for Mid-Autumn Festival

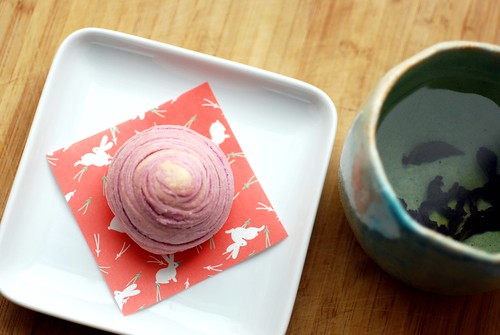
Tea & bunnies

It's been mooncake season for weeks, if not months now, and the stores have been overflowing with more types of mooncakes than you could shake a stick at (and the packaging gets fancier and fancier every year, although the selection here is still nothing compared to what you can get in Asia!) I, however, have not had a single mooncake (and no, my mooncake-molded fish cookies don't count) yet this year! Which is okay, because I'm not really a fan of the traditional type--too sweet, too oily, and too rich. Fortunately during my food blog browsing, I kept running into photos of the gorgeous, spiralled Teochew style mooncakes and decided I might as well try making my own mooncakes this year! I really liked the instructions at House of Annie's blog, so I went with her recipe, omitting the pandan flavoring. Anyway, enough babbling, on to the process!

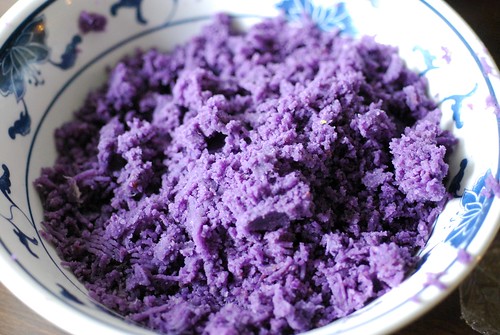
Okinawan sweet potato

The first thing I did was to make the filling. In this case, I used Okinawan sweet potatoes which I microwaved and then pushed through a sieve (you could use a ricer, or just mash it with a fork) and mixed with butter, a splash of milk, and a bit of sugar. Make sure you taste your filling and adjust because mine definitely needed more sugar. Next time, I might actually mix some condensed milk into this, that sounds pretty delicious actually. And I think steamed and mashed kabocha squash would also be a great filling. Roll into 20 balls and set aside.

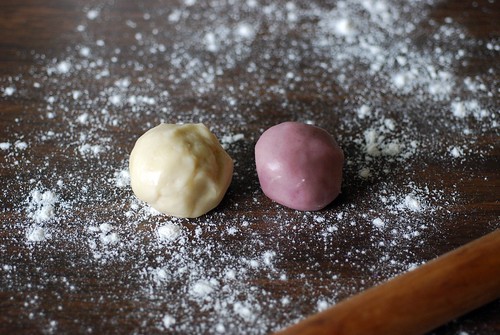
Doughballs

The key to making the flaky, layered pastry is the two different kinds of dough. The un-colored ball of dough on the left is made with butter (and kind of with the techniques you would use to make a pie crust), while the dough on the right is made with oil and simply stirred together. Oh, I used a few drops of food coloring to tint the oil-based dough.

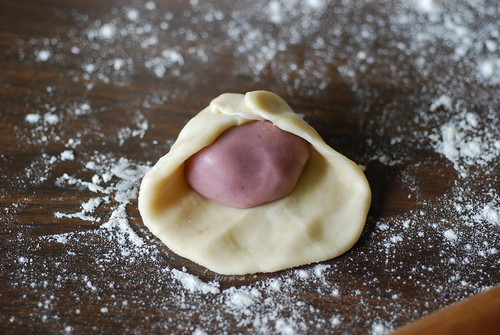
Combining the doughs

Wrap the oil-based dough in the butter dough, and pinch to seal. Then roll out into a rectangle (or an oblong, if you are incapable of rolling things into rectangles, like me). Then roll it up, like a jelly roll, and turn it 90 degrees:

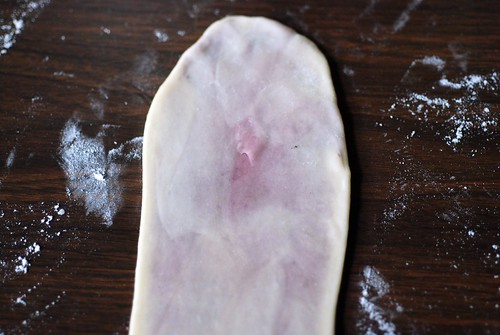
Second roll

Roll into a rectangle/oblong again.

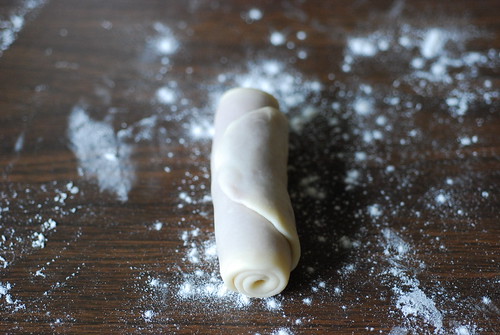
First roll

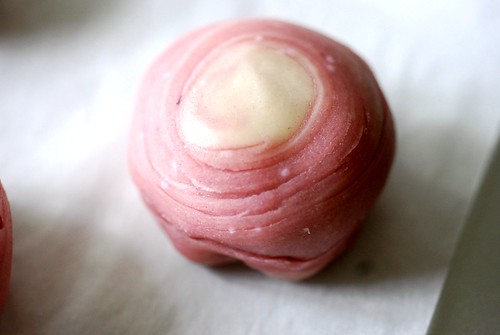
I really like how you can see the colored dough sealed inside. Roll this up again into a jelly roll, and then cut in half.

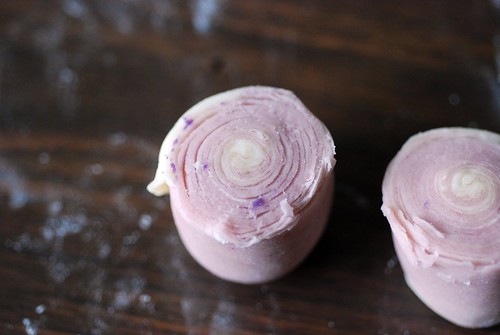
Layers

And you'll see this! You can see all the layers that have magically formed. I thought this was really cool! And I don't think it's because I'm easily impressed--this is really kind of like magic, if you ask me! You then flatten and roll this into a round, and if you can, make the edges a bit thinner than the center (like when you are making dumplings!).

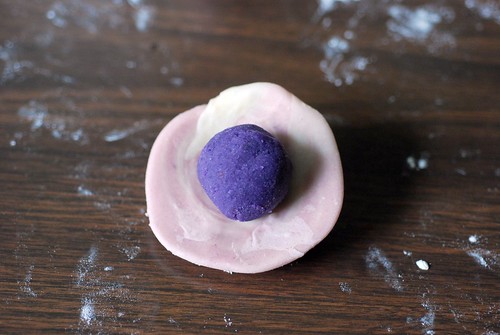
Filling

Flip the round over, and put a ball of filling in the center, then gather and pinch the edges to seal. I found the dough a bit stiff and had problems getting it to stick together occasionally, but that was easily fixed with a dab of water to moisten the dough.

Before baking

This is what you'll end up with. You'll be able to see the rings/layers of pastry, and this dough seems to be able to stand up a fair amount of handling, so it's not quite as fiddly as I would have expected. Repeat with the remaining dough, and place your shaped mooncakes on a parchment lined baking sheet. They'll need to be baked at 350F for about 30 minutes, or until set and lightly browned on the bottom.

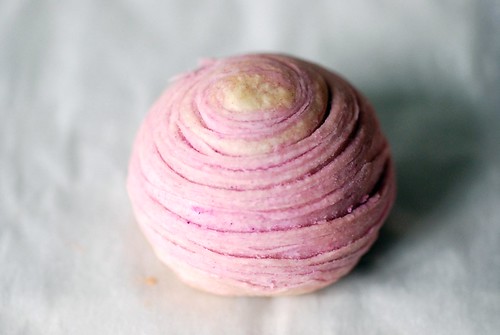
After baking

After baking, the layers will separate a bit so that they're more defined. Isn't it gorgeous? I am best pleased, even if the filling isn't sweet enough!

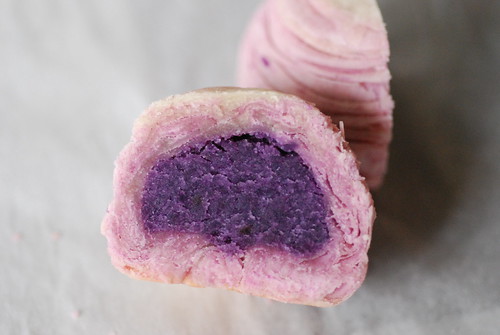
Purple innards!

I will leave you with a shot of the innards--I'm so happy that the sweet potato kept its purple color. Can't wait until tomorrow night when I can hang my head out of my apartment window and hopefully gaze at the moon while I munch on one of these!

Sunday, September 4, 2011

Woohoo, Laduree Finally Opened!!!

DSC_1072

(Warning--this post has a lot of exclamation points in it!)

Laduree finally opened in NYC!!! It's actually been confusing--they were supposed to open the 22nd, then it got pushed back to the 26th (which was when the hurricane was coming through), then their website said the date was actually the 29th while their Facebook page still said the 26th...anyway, they are finally open!! Woohoo! Now, the Upper East Side is not my usual stomping grounds (Tom Ford and Lanvin being somewhat out of my price range) but for macarons, I am totally willing to traipse across town!

IMAG0070

Of course, once I got to the other side of town I was greeted by this--a massive line that ran all the way down the block. Geez, LOOK AT THIS LINE!!! 20 minutes later, we had moved maybe 5 feet and then someone from further up the line said something about the wait being an additional 30 minutes once you actually got inside the store...which made at least five people in front of me give up. Woohoo! The waiting was made easier by the friendly folks standing in front of and behind me, and it was nice to meet other crazy people who are willing to stand in line for food.

IMAG0066

An hour in and we finally were standing in front of the display windows! So close and yet so far away! Oh also, at this point we could see that there was in fact another line inside that snaked back and forth, and all those people were blocking my view of the macaron counter--I think I had a mild fit at the possibility that there might not be any salted butter caramel macs left! (Although the nice man in suit-who-was-not-the-president-but-was-obvs-important assured me there were plenty left.) Another 20 minutes of waiting once we were inside, a quick selection, and I was out the door (actually the hardest part, because I had to dodge around the line!)

Macarons, woohoo!

And YAY, MY HAUL!! Oh, I should just point out that this is the standard box; they have all kinds of gorgeous gift boxes but you do pay a bit extra for those. My precious, precious salted caramel macarons are in the bottom right corner. Also, years ago when we went to Paris, we picked up a box of macarons at Laduree and then stupidly put them in our bike basket, so that by the time I got to eating them, they looked like this. I am so very pleased to have undamaged macaron photos now. (Also, apparently they are currently flying all of their macarons in from Paris, not baking them on-site.)

Macaron innards

And a bonus shot of the insides! Mmm, sweet sweet goodness....I can report the salted caramel is still my absolute favorite. The green apple tastes exactly like a green apple Jolly Rancher, which I am not 100% sold on. Anyway, don't worry, I haven't eaten these all in one shot, because I am not THAT crazy! I've still got a bunch left for later today...and tomorrow...and maybe even the day after that. YAY!!

Ladurée New York
864 Madison Avenue
New York, NY 10021


Sunday, August 28, 2011

Kale, Chickpea and Sausage Stew (and a little rain)

Chickpea, kale & sausage stew

So you might have heard about a little storm called Irene....well, fortunately the storm did not live up to expectations here. In fact, I slept through most of it, and when I woke up this morning, I couldn't even hear the rain/wind. Of course, those in other areas aren't as lucky; my parents lost power and there's definitely pretty bad flooding in Jersey and LI, but all in all, it could have been a lot worse!

I had been all worried about not having power and having to keep myself entertained--I laid in a supply of books (I'm currently halfway through the 4th in the Song of Fire and Ice series), charged my mp3 player, dug out some yarn, and then I cooked a giant pot of this insanely delicious stew to last the weekend. (Oh, I might have laid in some, ahem, liquid supplies too.) This is pretty much the only way I want to eat kale, but this stew is so delicious, I would actually buy kale to make it. I first saw this recipe over at Tamarind and Thyme and I am HOOKED! I think it would be delicious even without the chorizo, but hey, pork is aces in my book.

Chickpea, Kale, and Sausage Stew, adapted from Tamarind and Thyme
2 sausages (chorizo, hot Italian, or whatever your fave sausage is)
1 onion, chopped
1 clove garlic, smashed
2-3 dried chilis (or a pinch of chili flakes), optional
olive oil
1 can chickpeas, drained and rinsed
4 medium tomatoes, diced
1 bunch kale (approximately 10-12 stalks), stemmed and roughly chopped
salt and pepper to taste

If you're using fresh sausage, just remove the casings and break it up into chunks. If you're using a cured sausage, chop it into bite size bits. Heat the olive oil in a skillet and saute the onions until translucent. Add the sausage and cook until browned. Add the garlic and chilis and let cook until fragrant. Toss in the tomatoes and stir until they break down slightly. Add the chickpeas and about a cup of water. Cover and let simmer for approximately 15 minutes. Uncover and scatter the kale leaves over the stew; if it's starting to look dry add a bit more water and put the cover back on. Let simmer for an additional 15 minutes, or until the kale is done to your liking (I like mine pretty soft, which takes about 25 minutes). Season to taste with salt and pepper. Serve with bread (although I also think it might be pretty fab over some pasta).

Water, water everywhere

I finally ventured out for a walk this morning, which was a bit weird because lots of people were out but no stores were open! There were lots of people in Riverside Park too, where I found this enormous pond; most of the grassy patches between the walkways were underwater. The dogs were having a great time playing in it, but the wind was still blowing pretty fiercely so I elected to head back.

Let's be mild!

Oh yeah, the one store that was open was M2M, where I picked up this can of coffee--mostly because the name made me laugh. Let's Be Mild! And mild it certainly was. Hope everyone weathered the storm and that your cleanup isn't too bad!

Friday, August 26, 2011

Green Tea Marble Cake

Green tea and ginger marble cake

Oh hai beloved oven! I have missed you so! Man, can you tell I'm super happy that the weather is cooling off a bit? I've been dying to get back to doing some baking (I mean, baking of stuff other than beets...) and now that things are calmer at work, I finally had the time (and energy) to do a little experimenting in the kitchen. (Of course, this meant that I totally forgot to eat an actual dinner, but er, um, cake batter is totally a good form of sustenance?) Anyway, I really wanted to try making marble cake, but I couldn't decide if I wanted to make green tea and ginger marble cake, or green tea and chocolate, so I did what any modern person does these days when they need help making a decision--I polled my Facebook friends list. (I suppose if I were REALLY modern, I would have used Twitter.) Naturally, they were no help at all, and suggested additional combinations! Hmph.

Eeny, meeny, CHOMP

In the end, I just made up a batch of basic marble cake batter and went nuts. And by nuts, I really just mean that I made green tea and ginger cake, and then brought back the old favorite, self-frosting Nutella cake with the leftover batter. Isn't this lineup cute? For scale, the smallest cake is only about 3 inches long by 1 inch wide. The largest pan is a silicone loaf pan I picked up from Muji and it holds about half of an average 8.5x4.5 loaf pan. I haven't really baked with silicone pans before, so I thought it was really amazing when the cake basically just slipped out without me even having to run a knife around the edges!

Ugly nutella and green tea cakes

I am quite pleased with how the marbling came out (in the top photo). I am less pleased by how the Nutella ones look--let's be honest. They are downright ugly! I was a little hampered in my Nutella-swirling efforts by the size of these little baking molds, but gosh!

Self-frosting Nutella Green Tea Cake

They look much better from this angle! Anyway, these are a variation on the much blogged about self-frosting Nutella cupcakes, which are such a genius idea. Basically all you do is dollop some Nutella straight on top of your unbaked cake batter, and swirl it in. As it bakes, some of it gets crusty, some of it gets melty, and all of it gets delicious.

I haven't decided yet which version I like better--the ginger version seems moister, somehow, but the ginger overpowers the green tea a little. I'm pretty sure I need to go have another slice of each, to be sure....

Green Tea and Ginger Marble Cake adapted from Dorie Greenspan's Baking
12 tablespoons butter, room temperature
1 cup sugar
4 large eggs
1/2 teaspoon vanilla
1/2 cup milk
2 cups white whole wheat flour (or all purpose)
1 1/4 teaspoons baking powder
1/2 teaspoon salt
2 teaspoons matcha (green tea) powder
1/4 to 1/2 cup chopped, crystallized ginger

Preheat the oven to 325. Decide on what shape and number of cakes you want to use, but this recipe is sized for a standard loaf pan. If you want to try both the ginger and the nutella versions, you could also consider making this into cupcakes!

Sift together the flour, baking powder, and salt and set aside. Beat the butter until smooth, then add the sugar and beat until thoroughly combined. Beat in the eggs, one at a time, making sure each is incorporated before adding the next. Stir in vanilla. On low speed, add the flour mixture in 3 additions, alternating with the milk (beginning and ending with the flour). Beat just until the ingredients are combined.

At this point, you are ready to flavor. If you're just making one loaf, then divide your batter roughly in half into two bowls. To one, add the matcha, and stir until the batter is all a glorious, Hulk-green. Stir the ginger chips into the other bowl. If you're going to make some Nutella versions as well, you can go ahead and divide the batters into two bowls, but set aside some of the green tea batter.

For the marble cake, you have two options--either alternately drop spoonfuls of the two different batters into your prepared pans, and then swirl with a knife, or, and this is what I do (because I am lazy), just pour your green tea batter into the bowl with the ginger batter, and give the whole thing a couple of quick folds, as if you were folding egg whites. Don't mix the batters, you're just aiming for streaks here. Pour into your prepared pan.

If you are making the Nutella version, take your leftover green tea batter, and spoon or pour into smaller tins or muffin cups. How much Nutella you add is up to you; the more you add, the harder it is to swirl in an aesthetically pleasing manner, but on the other hand, the more Nutella, the more delicious! Drop dollops of Nutella directly onto the surface of the batter with a spoon, then take a knife or a skewer, and give it a couple of swirls. Bake until the cakes are set and pulling away from the edges of the pan slightly; a skewer will come out clean (a few crumbs of Nutella are fine). In the pans I used, the mini cakes took about 15 minutes, the largest pan took about 45.

Wednesday, August 24, 2011

Woohoo, it's Wednesday

Hello Mr. Melon

The week is half over! Only a few more days to my next batch of jam making (this could be becoming a bit of an obsession...) In the meantime, Mr. Melon here would like to wish you a happy Wednesday that is free of earthquakes (seriously!) or any other strange events.

(As you might have guessed, this came from my CSA and good god is it huge!)