Monday, May 31, 2010

Quinoa Salad

Quinoa Salad

Funny story about quinoa--the first time I tried it, we were inspired by David Lynch. Yes, THAT David Lynch, the genius behind Twin Peaks (I only watched this in the last year but I looooove it). Anyway, one of the extras on the Inland Empire DVD is this hilarious "cooking lesson" about making quinoa! Seriously, you have to watch it--it's available on YouTube here. The man is definitely passionate about his quinoa (and his organic frozen broccoli), but our results based on his cooking lesson were not er, too brilliant. I was definitely not sold on quinoa, nutritional benefits or not.

Fast forward a few months to a visit to some friends in DC, where we were served quinoa salad (along with a brilliant chickpea curry). "Oh no, quinoa," I thought to myself. "I hope they didn't follow David Lynch's recipe." HAHA. No I kid. I actually thought eh, I'll just try a little to be polite. Next thing I knew, I was back in the kitchen, making a giant pile of quinoa salad on my plate, and asking for the recipe. (I'm not sure what the original source is, but I'm reproducing the recipe as my friend sent it.) This is a great recipe for hot weather, it's light, refreshing, and can be adjusted easily to accommodate whatever vegetables you have kicking around that need to be used up.

Quinoa Salad
1 mango, small dice
1 red bell pepper, small dice
1 cup chopped scallions
1 cup fresh cilantro, chopped
2 tablespoons red wine vinegar (I used lemon juice)
2 tablespoons olive oil
1/4 tsp. salt
2 cups cooked quinoa
1 can black beans, drained & rinsed

Combine mango, pepper, scallions, and cilantro in large mixing bowl. Add lemon juice, oil, and salt. Add the quinoa and still until combined. Fold in the black beans.

Serve chilled or at room temperature. I think adding some cucumber would also be great, and when they are in season, diced nectarines instead of mangoes would probably be good too.

Sunday, May 30, 2010

Weekend Breakfast: Cherry Shortcake

Cherry Shortcake

Aren't 3 day weekends the best? It's Sunday but I'm not dreading going back to work because I get a whole extra day off tomorrow--woohoo!!! I slept in a bit this morning and then eventually headed out to the farmer's market; strawberry season is in full swing and I could not resist and came back with a LOT of strawberries and some asparagus. On Friday, we got out early so I headed down to Chinatown and came back with (yes, more) mangoes and cherries, so I am awash in yummy things to eat right now (well, except for the watermelon that I put in the freezer to chill quickly and then forgot about--whoops!). Have I mentioned before that this is my favorite time of the year?

DSC_0495

Anyway, one of the things I like to do on leisurely weekends is to have a nice breakfast. During the work week, my main goal is speed (I'm chronically late to work) so I usually just eat some yogurt or leftovers, or if I'm really running late, I'll grab a bagel to eat at my desk. But since I have plenty of time (and fruit!) this weekend...shortcake it is! I made a half recipe of cream biscuits, which are so easy and fast to put together, you can be eating in 30 minutes, and that includes the time to prepare your fruit.

DSC_0496

Look how high these biscuits rise! I would have used strawberries for my shortcake but, um, I ate them all. Cherries are nothing to sneeze at, though! Just pit, mash slightly with a bit of sugar, and let sit while you make your biscuits. When they're done, split them open, top with a few spoonfuls of cherries, plop on fresh whipped cream (as much as you want!) and enjoy. Ah, love the weekends! Hope you are all having a fabulous one too!

Cream Biscuits
3/4 cup unbleached all purpose flour
1/4 cup cake flour
pinch salt
1 1/2 teaspoons baking powder
1/2 cup cream
melted butter to brush on top of the biscuits
coarse sugar, optional

Preheat oven to 425 F.

Sift together the flours (you can use all AP flour, but the cake flour makes for a more tender biscuit), salt, and baking powder into a medium bowl. Pour in the cream and stir until the dough just comes together. You may need a tablespoon more if you live somewhere very dry, but the goal is to be able to squeeze the dough and have it come together without falling apart. Turn out onto a lightly floured surface and pat out into a rectangle. Fold into thirds (like a letter), and flatten back out into a rough rectangle about 1/2" to 3/4" thick. Cut biscuits with a 2" round cutter and place on a parchment lined baking sheet. Pile the scraps together and cut out more biscuits. I get 5 2" biscuits out of this recipe. Brush the tops of the biscuits with melted butter; if you're making shortbread, sprinkle a bit of coarse sugar on top.

Bake 13-15 minutes, or until golden brown and crusty. If you're making shortcake, cool for 5 minutes before splitting and filling with fruit and whipped cream. Serve with tea (and extra whipped cream--hey, it's the weekend, enjoy it!)

Wednesday, May 26, 2010

My Favorite Dumplings

DSC_0455

I've been sitting on this post for weeks--WEEKS. Why? Well, partially because I tend to write about dessert or otherwise sweet things. But MOSTLY because I just cannot get a photo of the finished dumplings that I'm satisfied with!! This is the best I can do, so hopefully it's enough to convince you that these are delicious! I've spent a lot of time experimenting with the filling and I think I've finally hit on the perfect combination (for me, anyway!)

DSC_0406

The secret is a mix of ground pork and ground turkey (I know, unorthodox but bear with me)--the ground turkey is very lean so the dumplings don't get so greasy. But won't they be too dry, I can sense some of you thinking--AHA! That's why you also add a tube of soft tofu (the kind that you can get at Korean groceries, I think it's meant for soon dubu). This results in a moist, juicy filling that is not greasy. This recipe makes a large amount, but that's perfect even if you are only feeding a couple of people, or just yourself, because you can put the extra ones on a cookie sheet, freeze, and then bag them up. Then the next time you need to whip up something quick...you already have dumplings on hand. Woohoo!

DSC_0410

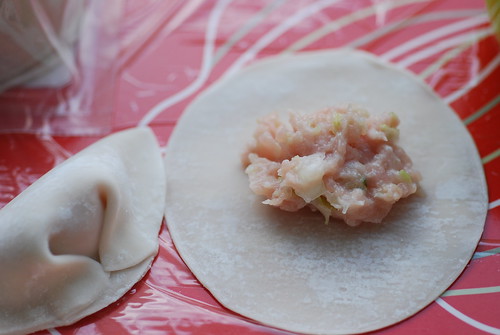
Anyway, I'm getting sidetracked--in addition to the meat and tofu, you also add vegetables. I like to use spinach that has been blanched, squeezed, and finely chopped, although in this batch I used nappa cabbage that was finely chopped, salted, and then pressed for 30 minutes to squeeze out some of the water. You can use pretty much any leafy vegetable (although I would recommend a mild tasting one as opposed to say, broccoli rabe) that you have on hand, and sometimes it's nice to also add in finely chopped garlic chives and scallions. That's the beauty of cooking, adjust to your own taste! Filling these does take some time, but once you get the motion down, they will go very quickly. I'll make a giant bowl of filling and then sit in front of the TV and fold dumplings. The photo above should give you an idea of how much filling to put in a dumpling; I'd say this is just under a tablespoon, but I don't actually measure it out, so they're not all uniform.

DSC_0403

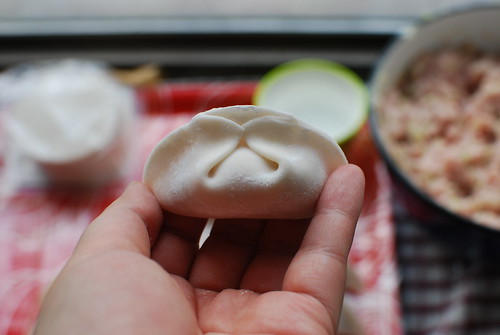
Everyone has their own method of sealing the dumplings; I don't go in for pleating the whole thing because it takes too long and I'm not that dexterous. Besides, this is the way my mom taught me! So, all you do is wet the edges of the wrapper, fold in half over the filing and pinch the center to seal, then make two pleats by pushing the unsealed wrapper edges towards the center. Try it, it's hard to explain but this photo should give you an idea. Press tightly to seal and presto! Dumpling. (Try not to trap any air in the dumplings because that will make them break when you cook them.)

DSC_0413

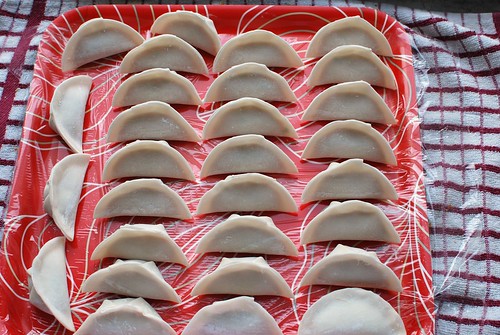
Here's part of the last batch I made; the recipe I'll give makes about 100 dumplings, depending on how generous you are with the filling. If you are planning on freezing them, place them on plastic wrap lined trays or baking sheets (make sure they are not touching each other) and freeze, uncovered. Then bag them up in freezer bags (don't forget to label them!) and store in the freezer.

DSC_0414

By the way, when you eat them? This is hands down the MOST IMPORTANT condiment!! Black vinegar. It totally won't be the same if you don't use this to make your dipping sauce. So, read on, and go make these! I'm pretty sure they will make your tummy happy!

Dumplings (in the style of Tofugirl)
1 pound ground pork
1 pound ground turkey
half a medium head of nappa cabbage, finely chopped or 1 pound spinach, blanched, squeezed dry, and finely chopped (or a combination)
1 tube of extra soft Korean style tofu (I use Pulmone)
1 teaspoon salt (you can use up to 2 teaspoons, but don't make it too salty because you'll be serving it with a soy dip)
1 inch knob of ginger, peeled and grated
1 tablespoon sesame oil
1 clove of garlic, mashed (optional)

2 packages of dumpling wrappers (the round ones)

If you are using nappa cabbage, after you finely chop it (easiest in a food processor, by the way), place the cabbage in a sieve, sprinkle a teaspoon of salt over it, and then weight it down with a plate. Let it stand for about half an hour, then squeeze as much liquid as you can out of it.

Combine all ingredients except for the dumpling wrappers and stir until well combined and the tofu is completely blended into the mixture. I find this easiest to do with the hands, although if you are squeamish about touching raw meat, you can use chopsticks or a big spoon. Be vigorous--you want everything really well incorporated. Wash your hands, then get ready to wrap! You'll want to have a bowl of cold water, chopsticks or a spoon for portioning the meat, a plastic-wrap lined tray to put your dumplings on, and your wrappers.

To form the dumplings, take one wrapper and place in in the palm of your hand. Put a dollop of the filling (a scant tablespoon or so) in the center of the wrapper. The first few you make, you may have to adjust the amount of filling until you figure out what works for you, but the goal is to have it completely enclosed with no filling oozing out. Brush the edges of the wrapper with water, and pleat to seal. (See above for a somewhat more involved description.) Try to press out all the air. Repeat!

To cook, you can boil them or make potstickers. For the former, bring a large pot of water to a rolling boil; drop dumplings in, stir (so they don't stick) and let the water come back to the boil. Pour in a soup bowl of cold water and allow the water to return to the boil once again. Repeat. The dumplings will float when they're done, but cut one open and make sure. Remove to plates with a slotted spoon and serve with dipping sauce.

To make potstickers, heat a nonstick skillet with a thin film of oil in it over medium heat. Place the potstickers in the pan, flat sides down. Fry for about 4 minutes, or until the bottoms are nicely browned. Add water (watch out, it'll steam up!) to the pan so that it comes up to about 1/4 of the way up the dumplings. Clap a lid on the pan and let it steam. When the water has almost evaporated, remove the lid, and cook until the pan is dry; this will recrisp the bottoms. When they are recrisped, they'll release easily from the pan. Serve, with the crunchy golden bottoms facing up. With dip, naturally!

Dipping sauce
2 tablespoons Chinese black vinegar
2 teaspoons soy sauce
splash of sesame oil
1 teaspoon sambal (optional, but nice if you like a little spice)
finely shredded ginger

Combine all ingredients in a small bowl and serve with dumplings.

Sunday, May 23, 2010

Anisette Toasts

Cookie Bowl
I get to use my penguin bowl again, yay!

(As you can see, I am trying to revamp the appearance of this blog a little, so the layout might change a bit. I'm not sure how I feel about this one yet. Thoughts? Opinions?)

A couple of weeks ago I was sitting around my friend's apartment, waiting to go to our gym class, when said friend offered me some anisette toasts. I think my unintelligent response was "Ani-wha?" About 15 of them later, I was cursing her and dragging my bloated, newly-anisette-toast-addicted self to the gym. You know what would have been great? Staying on the couch and finishing the rest of them.

Batter
Batter scooped onto baking sheet; I only made a quarter at a time

So, what IS anisette toast anyway? Well, it's basically biscotti! I googled around a bit and it seems like Stella D'oro is a producer of these--I used to ride past the Stella D'oro factory in the Bronx every morning on my way to high school and production days were the best because at least half the ride would smell like baking cookies. Which is much better than how NY usually smells (although still, nothing beats the stench of the Meadowlands over by Newark Airport in the summer--man, I always feel bad for tourists flying into Newark, imagine the first impression of this area being the smell of the Meadowlands and the Ikea in Elizabeth.) I actually saw anisette toasts for sale at the grocery, but my friend's grandmother very kindly shared the recipe. YAY. I love family recipes!

DSC_0488
After first bake

These cookies are super easy to make. The recipe calls for margarine, but as an avowed butter devotee, I decided to make half the batch with margarine and half with butter. Honestly, I didn't think there was too much of a difference--the butter ones are maybe a tad more crumbly but I just baked them for an extra couple of minutes. So, use whatever you have on hand.

DSC_0470
Sliced and ready for the second baking

I had a hard time visualizing the shaping until I actually was putting the dough onto the cookie sheets but it is seriously dead easy (see second photo). I suppose you could also pipe or spoon the dough onto into a log that's about 3 inches wide, for cookies that are all perfectly uniform, but scooping and dropping the dough is much less work! These are delicious with tea and would probably would also be awesome with coffee, but I have none and I'm too lazy to go buy more beans.

Cookie Jar
This jar will be empty soon.

I rewrote the recipe very slightly, but this comes courtesy of my friend's grandma. Thank you, Mrs. C!

Anisette Toasts
1 stick margarine (or butter), softened
l l/4 cups sugar
4 eggs
1/2 tsp salt (if using butter, otherwise, omit)
2 l/4 cups flour
2 tsp. baking powder
l/4 tsp anise flavoring

Preheat oven to 350F.

Cream sugar and margarine. If using butter, also include salt at this point. Beat in the eggs; the mixture may look curdled, but that's fine. Add dry ingredients and anise flavoring, and stir until smooth.

Using a l/3 measuring cup - drop 6 mounds of batter on the cookie sheet (so you are forming 2 rows of 3 mounds). The batter will spread and run into each other slightly and rise. Bake about l3-l5 minutes till slightly browned. Remove from cookie sheet and separate columns and cut into 1/2" slices. Lay the slices on the cookie sheet on their sides and bake for 6 minutes; flip slices over, and bake for another 6 minutes. Remove to a wire rack and cool. Repeat with remaining batter.

Makes a large cookie jar full that goes very, very quickly.

Saturday, May 22, 2010

Urban Gardening

ginger bud

I bought this ginger at the end of April and to my surprise, it started sprouting a bud. This photo was taken May 2nd.

DSC_0486

Well, look at this crazy thing now! (The rightmost sprout is the one that was in the top photo.) I don't know if I should try buring it in some soil to see what happens, or just keep it in some water, or what. But it's not the only thing growing around here...

DSC_0484

Ha, ha! Obviously, the title of this post is a joke. I found a sweet potato that was left from our CSA (so it's been hanging around since last November!) that apparently got tired of waiting to be roasted, and decided to start the cycle of life. I'm going to bring this guy home and give it to my dad to plant in the backyard. Congratulations, sweet potato, you have definitely avoided the horrible fate of being eaten.

Tuesday, May 18, 2010

Another Birthday

Birthday Mango Cheesecake

This time, it's mine! (How self-congratulating of me! Please forgive me, I just want to show you pictures of my trip to Vancouver.) Another year older...well, everything still works, more or less (joints still bend, etc.) so I can't complain too much. Besides, if you calculate my age based on maturity level, then I'm probably still back in my teens! Woohoo!

Mango cheesecake slice

I wish I didn't have to spend the day at work, but, that's the way the cookie crumbles. But I'm starting the day off with a slice of this mango cheesecake, which should take some of the sting away. (Mango count: 4 left!) This is especially dedicated to Flickr bud kaimono888 and blog/Flickr bud Carly, both of whom have been suggesting mango cheesecake to deal with my glut of mangoes. Thanks for the good suggestion, ladies :) This is my first time making a chilled (vs. baked) cheesecake, and I'm converted! It's deceptively light in texture, because you fold in whipped cream, so it's sort of moussey.

No Japadog No Life!

Enough about mangoes and cheesecakes! Let's talk about my weekend trip to Vancouver to celebrate my birthday. It was really a GORGEOUS weekend, and actually quite hot in the sun! I definitely got some color. First order of business? Trip to Japadog! After all, no Japadog, no life!

Spicy Cheese Terimayo

I got a spicy cheese teri mayo hot dog (it's so hard to choose) and Pyota got an ume dog. He claims it's his favorite so far, but I dunno, the spicy cheese teri mayo was FREAKING DELICIOUS. I want another one. RIGHT NOW. After we were fueled up, we hopped on one of the adorable little ferry boats and went over to Granville Island. I love these boats, they are SO CUTE.

DSC_0473

See? Plus when you ride one, you are really, really close to the water. It's very relaxing, unless your pilot is new to the job. Anyway, we wandered around Granville Island for a bit and had some beer at the Granville Island Brewery (mmm, honey lager) and picked up some groceries for dinner. It's kind of touristy, but there's no denying that there is some really great stuff there (and I just remembered that I meant to buy salmon candy. Drat.)

DSC_0479

On another day, we were planning to go hiking in Pacific Spirit Park--Camosun Bog, specifically (left from the last ice age! How cool is that?) But, we took a wrong term and ended up at Wreck Beach, which is a clothing optional beach. Whoops! This photo is actually taken at Wreck Beach, just on the deserted end--behind us were a lot of naked people enjoying the sun. I felt a bit weird, and stared at the ground a lot because I didn't want anyone to think I was a perv or something, since we were wandering around fully clothed. Hah! Anyway, one of the things I love about Vancouver is how you can see the mountains from damn well anywhere in the city.

Hurrr?

Another highlight (who am I kidding--THE highlight!) was going to the Vancouver Aquarium, where they have OTTERS. Is that a face to love or what? I took about 100 photos on this trip, like 60 of which were photos of otters--and out of THOSE, only 3 came out! Hah. They are quick little things.

DSC_0550

Moon jellyfish.

DSC_0494

The aquarium is located in Stanley Park, so we had a really nice walk to get there. Along the way, we spotted this smart turtle, who is clearly on to a good thing and not giving it up anytime soon. And, it being spring, there were flowers everywhere!

DSC_0487

DSC_0491

French Apple Cake

We went to Provence for my bday dinner, and it was super yum! I had wild salmon (so good) and this really, really delicious apple cake for dessert. I realize I should have taken a better photo of the cake, but, hey, I'm amazed I took a picture at all rather than diving right in.

BC artisanal cheese plate

And here's the man's cheese plate. Nice selection, right? And then, we had to hotfoot it to the airport so I could make my flight. A wonderful weekend, all around. Despite the gloominess of today (darn you, rain!), I think this is gonna be a good year.

Thursday, May 13, 2010

Break Time

Trip time

Whoops, I missed my Wednesday update! Oh well, I don't think anyone is actually reading my Wednesday travel posts anyway :) But, I am about to leave for a quick trip, and as you can see, I have my faithful buddies in tow. Be back soon, hopefully with lots of yummy food to share!

Sunday, May 9, 2010

Coconut Tapioca

DSC_0445

Have you seen the movie Spirited Away? Don't these remind you of the food that the little sootballs eat? (If you haven't, why are you still here reading?! Go watch it now! It's so good!) Anyway, these are actually tiny tapioca pearls, and when I was standing in the grocery, are you surprised that I bypassed the plain white ones and went for the colorful ones? No, me neither.

DSC_0450

Besides, they're so much fun to take pictures of! Color!!! They are *really* small tapioca, only slightly larger than the nonpareils I sprinkle on top of cupcakes. As such, they cook very, very quickly. Perfect! Anyway, I decided to make a coconut tapioca drink/dessert soup based on the one we get at Safran (now called Jasmine), one of our standby restaurants when the girls get together.

DSC_0452

I actually ran out of canned coconut milk, but fortunately it's easy to make it yourself if you have shredded (unsweetened) coconut on hand. I've had a pack in the freezer for months, so this ended up being kind of a pantry-clearing dessert. To make coconut milk from dried, shredded coconut, you simply put two cups of coconut in a blender with two and a half cups of hot water, whizz for a minute or so, and then squeeze through some cheesecloth. Presto, thick coconut milk! (You can add another two cups of water to the squeezed out coconut and repeat for thin coconut milk.) The coconut milk is then mixed with ginger syrup and chilled.

DSC_0458

Here's the tapioca after it's cooked. It's not as colorful, but I love the pink glassiness of it.

DSC_0462

And here's the soup put together--coconut milk, tapioca, and diced fruit--strawberries and mangoes, because that's what I had on hand. By the way in case you are curious, I now have 8 mangoes left, so I'm making pretty good progress.

DSC_0464

Refreshing and light, perfect for hot weather. Which is exactly why I made it on this weekend, when the weather has unexpectedly taken a turn for the cold (it's supposed to get down to the mid 40s F tonight!). Oh well, no one ever said I had a knack for timing! It's been a nice weekend all around, quiet and relaxing, and I even managed to get over to our local bakery, Silver Moon yesterday to pick up a few things.

Breakfast from Silver Moon

I love their fig bread and I'm slowly trying out all the other varieties--this time, I picked up a pain au lait, a palmier, and a lavender cookie. The lavender cookie confirmed that I do not, in fact, like lavender flavored food. The palmier and the pain au lait were great though! In fact, the pain au lait reminded me of my schoggibroetli, except with raisins.

Hope everyone had a great weekend too!

Coconut Tapioca
For the sugar syrup:
1 cup water
1/3 cup sugar
3 slices fresh ginger, smashed

1 can of coconut milk, shaken (or make your own, above--you'll need about a cup and a half)
1 1/2 cups small tapioca pearls
1 cup diced fruit of your choice

For the sugar syrup, combined the water, sugar, and ginger in a small saucepan and bring to a boil. Cook until the sugar is dissolved. Set aside and let cool to slightly warm.

If you are using canned coconut milk, give it a good shake and make sure it hasn't separated. If it has, warm it slightly and give it a good whisking to make sure it's homogeneous. Stir sugar syrup in, including the ginger slices. Cover and refrigerate until very cold.

Meanwhile, soak the tapioca pearls in cold water for about 20 minutes. Bring a saucepan full of water to the boil, drain the tapioca, and cook for 5 minutes or until the tapioca are translucent. Drain and let cool. Add to the coconut milk and stir in your diced fruit. Serve in small bowls or glasses and enjoy, preferably on a hot day!

Friday, May 7, 2010

Best Time of the Year

DSC_0427


*Before I start rambling--I am thinking about buying a food processor, can anyone share recommendations? I want one that has a big enough bowl so that I can make pie dough in it. Thank you :)*

Yes, it IS the best time of the year--Chinatown is flooded with mangoes, especially my favorite ones, the champagne! (also known as ataulfo) I maaaaay have gone overboard the other day when we ran down to Chinatown during lunch. But they are so cheap now! And I also spied some really really tiny mangoes, like the length of my thumb, but I resisted buying those because, well, frankly I couldn't carry anymore.

DSC_0424

See? I bought a dozen, and they weighed a ton! I've eaten two so far, and breakfast this morning is a cut up mango and a couple of Jules Destrooper ginger thins (my latest obsession). I've got some good ideas for what to do with these after I'm tired of eating them plain (hah!) so stay tuned.

Have a great weekend everyone!

Wednesday, May 5, 2010

Hong Kong Post 4: Lamma Island

DSC_0112

Alright! Time to resume HK trip posting. This one is about a little hike we did on Lamma Island, which is COMPLETELY DIFFERENT from Hong Kong. For one thing, there are no malls. No skyscrapers. No frenzied rushing about (well, maybe the little trucks that seem to careen around.) And it's easy to get to--just hop on a ferry from Central and you can be a world away on Lamma Island in under 30 minutes.

DSC_0105

I think this dog is a very accurate representation of the pace of life on Lamma. This is a great choice for a day trip because you can take the ferry to one of the two main villages, and then hike (well, walk really--it's all over paved trail) to the other village, then hop on another ferry and head back to Hong Kong Island. I can't remember which village we started at and which one we ended at, so I'll just give you both names now--Yung Shue Wan and Sok Kwu Wan. Hm...now that I think about it, I think we started at Sok Kwu Wan.

DSC_0110

Unlike the rest of Hong Kong where like, all the public parks had No Dogs Allowed signs, Lamma seems pretty dog friendly--hey look, they even get their own designated toilet spot! Sweet.

DSC_0111

This is how most of the walk looked--lush, vibrant, green. And quiet! I felt myself relaxing completely. The trail takes you up through the higher points of the island, and this is the view from almost-the-top:

DSC_0119

Pretty nice view, right? I wouldn't mind living here, especially if they let me drive one of the mini trucks around.

DSC_0129

Ah, and now FINALLY, my first mention of food from this trip! This is at Yung Shue Wan (which is how I finally figured out that we did in fact start from Sok Kwu Wan) and if you go, I highly recommend that you take the same route that we did because then you get to end your walk with a big, delicious bowl of...

Tofu Hua on Lamma Island

Tofu hua! (Also called tohua or tofa or tofu fa.) It's very, very, very soft fresh tofu that is served with a gingery syrup. It is delicious, especially if you get it cold (we got one bowl hot and one bowl cold, and I definitely preferred the cold.) It's been described as tofu pudding, but it's not pudding--it's straight up tofu. Just very fresh, and silky smooth. This place (Ah Por Tofu Fa, or Grandma's Tofu Fa) seems to be famous, judging from all the articles and stuff hanging around the shop (I use the term shop very loosely, it's outdoors, under a tent). And justifiably so! I couldn't help but notice that literally everyone who came in for a bowl took a photo of theirs too. Finally, a land where I don't feel like an alien for photographing my food ;).

Afternoon sun

Bonus? This beautiful orange cat that lives at the tofu shop. Yes, everyone was trying to grab a photo of the cat, too. Well, all the girls anyway. After we licked our bowls clean, we hopped back on the ferry and headed off to dinner with a friend at a daipaidong. But that is for another post (the one where I round up the food we ate!)

Okay, that's part 4. Next installment, Macau, same bat time, same bat channel! I'm going to my first hot yoga class ever tonight, so hopefully I survive to post another day.

Sunday, May 2, 2010

It's Birthday Season

dots

Whew, what a busy weekend! Go go go up until today, when I just ran out of steam. I did spend a couple of hours wrapping dumplings. But, that's not the subject of today's post! Today, we talk about birthday cupcakes! I don't know why, but I feel like there are sooooo many birthdays to celebrate in May (including mine!). Seriously, there are at least 3 of my friends who have birthdays this week, and the rest of the month is pretty much like that too. Better exercise more to make up for the birthday dinners I'll be eating.

Birthday cupcakes

First up is L! It's a big birthday for her this year, and although I'm sad I missed her surprise party, at least I could send cupcakes along. (And, for your information, Mr. Party Planner, yellow cake + chocolate frosting does NOT equal chocolate cake! But, I'll forgive you since you also don't know what a grapefruit is ;).) I hear they went over well, which makes me happy; I was really worried that the buttercream would melt in transit (Saturday being the first really hot day we've had this year.) I had one leftover (that wouldn't fit in the cakebox) that I ate for breakfast this morning--yum, love this chocolate frosting. The cake is a yellow buttermilk cake from the Joy of Cooking, and the frosting is a simple chocolate buttercream from King Arthur. Not too sweet, very chocolatey. Yummy.

sugar flowers

I'm not much of a decorator, but I can manage to pipe frosting neatly (most of the time). And hey, what is more cheerful than nonpareils? Or sugar flower sprinkles? Simple, but cute, right? And a variation from my usual sugar star sprinkles. (I can't find my jar of sugar stars! Where did it goooooo?)

Anyhow, happy birthday to L and all the other May babies in advance!