Showing posts with label baking. Show all posts

Monday, January 23, 2012

Happy Chinese New Year!

CNY Greetings 2012

Or as I say, Gong xi fa cai, hong bao na lai! (Good luck and fortune, now gimme my red packet! It sounds better in Chinese.) Today is the start of the Year of the Dragon; if you believe in astrology and all that, you can go look up your specific horoscope for how this year will go for you. I read that I'll be having a difficult year in terms of health, and specifically that I may be injured at work! I will be using this as a pitch to work from home more often...

Like our centerpiece?! You've always got to have apples and oranges (auspicious colors, see) and Cedric was our stand-in for a dragon. He's got wings, I'm convinced! But there are dragons in edible form, too!

Last year, I decided I was going to make all of the zodiac signs into cookie form (yes, this will be a 12 year project!). As it turns out, it was a good year to start on, the rabbit being relatively simple in shape. The dragon? Not so easy! I kicked around a few ideas (and Megg had suggested a Trogdor shaped cookie), but I really wanted something rounder and cuter (like the bunny cookies, but, you know, dragony).

IMAG0288

So I took some green tea and vanilla shortbread dough, and made something vaguely dragon shaped. Here is a crappy cell phone photo of what I was going for. See? Kind of dragony?

Dragon cookie fail :(

Aaaaand here is what happened after baking. Total collapse, whoops! It should not have been such a surprise to me that shortbread dough wouldn't hold its own weight. Sigh.

DSC_0568

So I took a break from dragon cookies and made pineapple tarts instead. As usual, I made my own jam; you can see check out this old post for step by step instructions on making pineapple tarts. I made them bite sized this year, figuring that would help with portion control.

Cedric eyes the pineapple tarts

Unfortunately, that just meant that they are that much easier to keep grabbing and munching! Whoops!

Coconut nian gao

Then I made another traditional food, nian gao. This is actually somewhat untraditional, as the typical nian gao is brown sugar based and steamed, whereas this version uses coconut and is baked in the oven. Nian gao is a type of cake made out of glutinous rice flour, and is quite similar in texture to mochi. It is rather delicious, and has caused me to gain several pounds already.

So anyhow, after all that, i came back to my deformed dragon cookies and stared at them, long enough that I decided maybe all was not lost and there might be a way to salvage them after all. And so, with a little creative arrangement and some (extremely) rudimentary photo editing...

What do baby dragons dream about?

I give you dreaming baby dragons. Yes, they dream of cookies. What, don't you?

Happy new year! May it be healthy and prosperous, and full of nothing but good things.

Saturday, January 7, 2012

Happy New Year!

Arrr num num

So did you make any resolutions? I usually don't bother, but this year I have four:

1. Less procrastination
2. More bento
3. Less complaining
4. More exercise

Lofty goals, to be sure! If I achieve 2 of these, I'll consider myself successful (and then next year my resolution will be, as they say at work, underpromise and overdeliver). Ahem! I just also want to point out that I did not procrastinate this post, I just haven't had time because I'm too busy overpromising at work. :)

Anyhow, you're probably wondering about my hungry little dino friend and what it is he's eyeing so beadily. It's not very pretty, I admit, and I had second thoughts about posting these photos, but you know what, things don't always turn out perfectly, and that's cool. The important thing is, it's delicious! And if you want to see what a proper galette des rois looks like, then you should go check out the photos and recipe at Chocolate and Zucchini. I hesitate to actually bestow the name "galette des rois" on mine!

DSC_0489

These galettes, also known as king cakes, are eaten in France to celebrate Epiphany. But there's no prohibition on everyone else enjoying them too, and if you've got frozen puff pastry and ground almonds handy, you can knock this together in very little time. Oh, also, since I was just making it for me, I made a mini version and didn't bother with the little token inside (traditionally it's served as a large cake and whoever gets the bead, bean, or whatever inside is the king or queen). Well, mine may be on the ugly side, but that almond cream certainly is delicious. I've got about a cup left and I have plans for it which will hopefully result in something more photogenic.

DSC_0484

By the way, this is Cedric, my dino friend. He's Canadian.

Margaret! Flowers!

And, guess what! I was watering my remaining plants and discovered that Margaret had put out new flowers! And one of them is even forming a strawberry. Apparently Margaret does not care about seasons. I'm very pleased that she's still alive because I managed to kill many plants in 2011.

First Meal of 2012

And finally, our first meal of 2012. I spent NYE in Vancouver and Py whipped this up the next day (I think we slept through breakfast). Sort-of-cioppino (but really fish soup). Delicious, and a nice, relatively healthy start to the year.

Saturday, November 5, 2011

Cinnamon Pull-apart Bread

Cinnamon loaf section

Oh, the joys of browing food blogs--the list of things I've bookmarked to make gets longer and longer every day, with no end in sight. And it's not very often that I actually get around to making things (although I have good intentions!) But sometimes you come across a photo or recipe that is so compelling that you must make it immediately--so it was with the cinnamon pull-apart bread from Joy the Baker. Actually, I first made this weeks ago, but it was so good that I kept craving it (and cursing myself for having given half of it away) and this weekend, I finally gave in.

Dough whisk

I always think of yeast breads as being too time-consuming to make, but honestly, that's kind of silly. Most of the time involved is waiting for the dough to rise, so it's not like you have to sit around babysitting it. This dough comes together really quickly, especially if you have a handy implement like the dough whisk! I stirred this up by hand in about 5 minutes.

Dough

It's a very wet, sticky dough, which is why it looks so rough here. That's just the way it should be, and I left it to hang out near my radiator for an hour or so while I went on with my normal Saturday morning tasks (and by tasks, I mean knitting my sock).

Dough

Here it is after an hour! Nice and puffy. This gets turned out onto a floured surface and then a bit more flour is kneaded in, just until the dough is smooth and loses its stickiness. It's actually a pretty nice dough to work with and didn't resist being rolled out (much). I got too floury to take more pictures, but basically you roll the dough out into a rectangle, cover it in butter, then sugar and cinnamon, and slice into strips which you stack and slice again! (Just go look at link above for the recipe and much better photos!)

Loaves rising

The stacks of dough squares get layered into a loaf pan (or multiple loaf pans, depending on size). You'll notice the smaller pan on the right; this one was the experimental loaf, and rather than buttering and sugaring the dough, I spread the layers with my new favorite thing in the entire world:

Biscoff spread

Biscoff spread aka speculoos spread! Okay--if you haven't had this? You have to go out and buy a jar RIGHT NOW. Think Nutella, except instead of chocolate, this is made out of GROUND SPICE COOKIES. Yeah, that's right--it's a spread made out of COOKIES. It's GENIUS!!

Speculoos spread loaf

Oh, what the heck--here's another gratuitous shot of my speculoos-spread loaf. I was a little afraid of the spread burning so I wasn't as generous with it as I would have liked. I should have added more! Fortunately I can just apply as I eat...

Speculoos loaf, baked

Here it is baked! The spread baked into a crusty kind of topping, which was good, but wasn't as good as caramelly sugar and butter in the original loaf.

Crazy cinnamon loaf

See all those gorgeous layers? As the name implies, after you turn this out of the pan, you eat it simply by pulling off layer after layer. But I highly recommend you invite someone to eat it with, because this can get addictive and before you know it, half the loaf has somehow disappeared....

Cinnamon loaf closeup

Now if you'll excuse me, there's some bread calling my name!

Sunday, September 11, 2011

Mooncakes for Mid-Autumn Festival

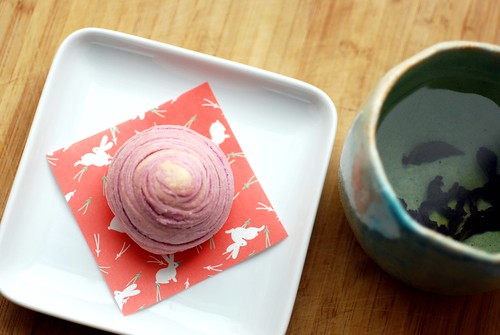
Tea & bunnies

It's been mooncake season for weeks, if not months now, and the stores have been overflowing with more types of mooncakes than you could shake a stick at (and the packaging gets fancier and fancier every year, although the selection here is still nothing compared to what you can get in Asia!) I, however, have not had a single mooncake (and no, my mooncake-molded fish cookies don't count) yet this year! Which is okay, because I'm not really a fan of the traditional type--too sweet, too oily, and too rich. Fortunately during my food blog browsing, I kept running into photos of the gorgeous, spiralled Teochew style mooncakes and decided I might as well try making my own mooncakes this year! I really liked the instructions at House of Annie's blog, so I went with her recipe, omitting the pandan flavoring. Anyway, enough babbling, on to the process!

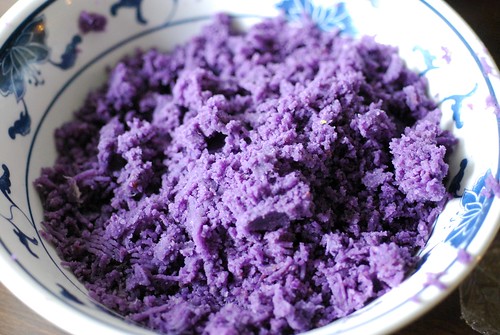
Okinawan sweet potato

The first thing I did was to make the filling. In this case, I used Okinawan sweet potatoes which I microwaved and then pushed through a sieve (you could use a ricer, or just mash it with a fork) and mixed with butter, a splash of milk, and a bit of sugar. Make sure you taste your filling and adjust because mine definitely needed more sugar. Next time, I might actually mix some condensed milk into this, that sounds pretty delicious actually. And I think steamed and mashed kabocha squash would also be a great filling. Roll into 20 balls and set aside.

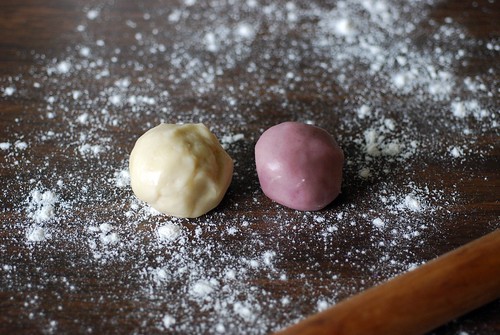
Doughballs

The key to making the flaky, layered pastry is the two different kinds of dough. The un-colored ball of dough on the left is made with butter (and kind of with the techniques you would use to make a pie crust), while the dough on the right is made with oil and simply stirred together. Oh, I used a few drops of food coloring to tint the oil-based dough.

Combining the doughs

Wrap the oil-based dough in the butter dough, and pinch to seal. Then roll out into a rectangle (or an oblong, if you are incapable of rolling things into rectangles, like me). Then roll it up, like a jelly roll, and turn it 90 degrees:

Second roll

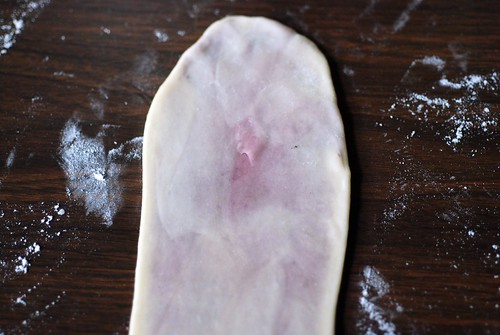
Roll into a rectangle/oblong again.

First roll

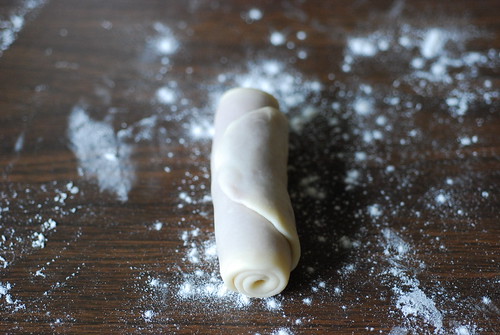
I really like how you can see the colored dough sealed inside. Roll this up again into a jelly roll, and then cut in half.

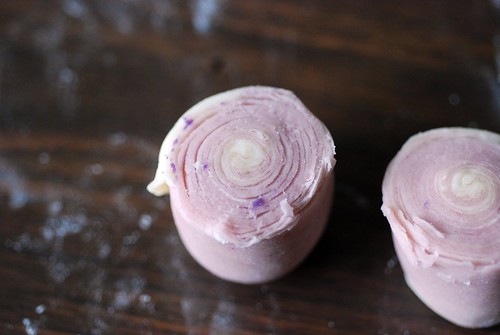
Layers

And you'll see this! You can see all the layers that have magically formed. I thought this was really cool! And I don't think it's because I'm easily impressed--this is really kind of like magic, if you ask me! You then flatten and roll this into a round, and if you can, make the edges a bit thinner than the center (like when you are making dumplings!).

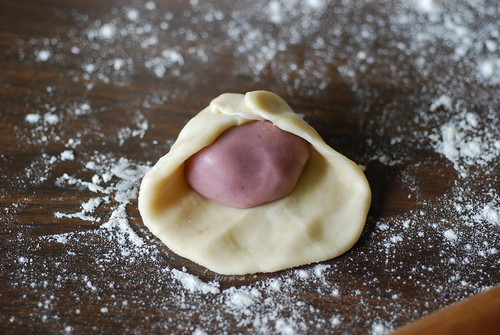
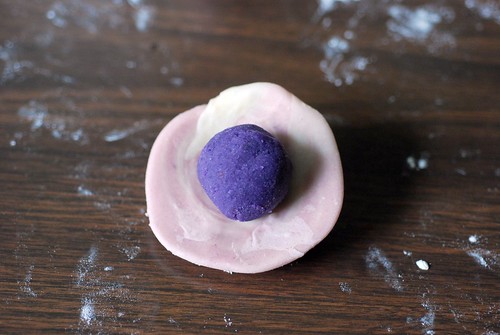
Filling

Flip the round over, and put a ball of filling in the center, then gather and pinch the edges to seal. I found the dough a bit stiff and had problems getting it to stick together occasionally, but that was easily fixed with a dab of water to moisten the dough.

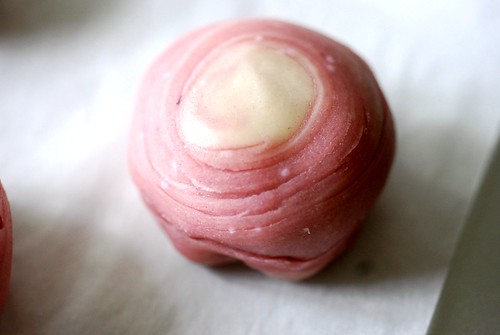
Before baking

This is what you'll end up with. You'll be able to see the rings/layers of pastry, and this dough seems to be able to stand up a fair amount of handling, so it's not quite as fiddly as I would have expected. Repeat with the remaining dough, and place your shaped mooncakes on a parchment lined baking sheet. They'll need to be baked at 350F for about 30 minutes, or until set and lightly browned on the bottom.

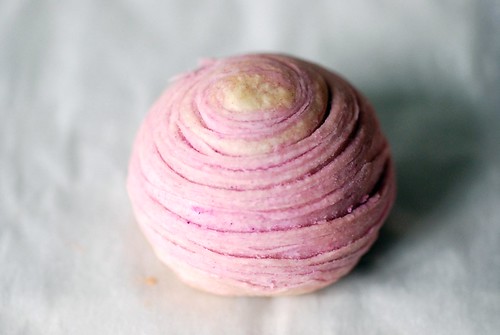
After baking

After baking, the layers will separate a bit so that they're more defined. Isn't it gorgeous? I am best pleased, even if the filling isn't sweet enough!

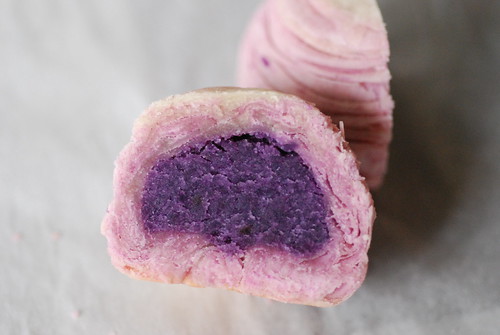
Purple innards!

I will leave you with a shot of the innards--I'm so happy that the sweet potato kept its purple color. Can't wait until tomorrow night when I can hang my head out of my apartment window and hopefully gaze at the moon while I munch on one of these!

Friday, August 26, 2011

Green Tea Marble Cake

Green tea and ginger marble cake

Oh hai beloved oven! I have missed you so! Man, can you tell I'm super happy that the weather is cooling off a bit? I've been dying to get back to doing some baking (I mean, baking of stuff other than beets...) and now that things are calmer at work, I finally had the time (and energy) to do a little experimenting in the kitchen. (Of course, this meant that I totally forgot to eat an actual dinner, but er, um, cake batter is totally a good form of sustenance?) Anyway, I really wanted to try making marble cake, but I couldn't decide if I wanted to make green tea and ginger marble cake, or green tea and chocolate, so I did what any modern person does these days when they need help making a decision--I polled my Facebook friends list. (I suppose if I were REALLY modern, I would have used Twitter.) Naturally, they were no help at all, and suggested additional combinations! Hmph.

Eeny, meeny, CHOMP

In the end, I just made up a batch of basic marble cake batter and went nuts. And by nuts, I really just mean that I made green tea and ginger cake, and then brought back the old favorite, self-frosting Nutella cake with the leftover batter. Isn't this lineup cute? For scale, the smallest cake is only about 3 inches long by 1 inch wide. The largest pan is a silicone loaf pan I picked up from Muji and it holds about half of an average 8.5x4.5 loaf pan. I haven't really baked with silicone pans before, so I thought it was really amazing when the cake basically just slipped out without me even having to run a knife around the edges!

Ugly nutella and green tea cakes

I am quite pleased with how the marbling came out (in the top photo). I am less pleased by how the Nutella ones look--let's be honest. They are downright ugly! I was a little hampered in my Nutella-swirling efforts by the size of these little baking molds, but gosh!

Self-frosting Nutella Green Tea Cake

They look much better from this angle! Anyway, these are a variation on the much blogged about self-frosting Nutella cupcakes, which are such a genius idea. Basically all you do is dollop some Nutella straight on top of your unbaked cake batter, and swirl it in. As it bakes, some of it gets crusty, some of it gets melty, and all of it gets delicious.

I haven't decided yet which version I like better--the ginger version seems moister, somehow, but the ginger overpowers the green tea a little. I'm pretty sure I need to go have another slice of each, to be sure....

Green Tea and Ginger Marble Cake adapted from Dorie Greenspan's Baking
12 tablespoons butter, room temperature
1 cup sugar
4 large eggs
1/2 teaspoon vanilla
1/2 cup milk
2 cups white whole wheat flour (or all purpose)
1 1/4 teaspoons baking powder
1/2 teaspoon salt
2 teaspoons matcha (green tea) powder
1/4 to 1/2 cup chopped, crystallized ginger

Preheat the oven to 325. Decide on what shape and number of cakes you want to use, but this recipe is sized for a standard loaf pan. If you want to try both the ginger and the nutella versions, you could also consider making this into cupcakes!

Sift together the flour, baking powder, and salt and set aside. Beat the butter until smooth, then add the sugar and beat until thoroughly combined. Beat in the eggs, one at a time, making sure each is incorporated before adding the next. Stir in vanilla. On low speed, add the flour mixture in 3 additions, alternating with the milk (beginning and ending with the flour). Beat just until the ingredients are combined.

At this point, you are ready to flavor. If you're just making one loaf, then divide your batter roughly in half into two bowls. To one, add the matcha, and stir until the batter is all a glorious, Hulk-green. Stir the ginger chips into the other bowl. If you're going to make some Nutella versions as well, you can go ahead and divide the batters into two bowls, but set aside some of the green tea batter.

For the marble cake, you have two options--either alternately drop spoonfuls of the two different batters into your prepared pans, and then swirl with a knife, or, and this is what I do (because I am lazy), just pour your green tea batter into the bowl with the ginger batter, and give the whole thing a couple of quick folds, as if you were folding egg whites. Don't mix the batters, you're just aiming for streaks here. Pour into your prepared pan.

If you are making the Nutella version, take your leftover green tea batter, and spoon or pour into smaller tins or muffin cups. How much Nutella you add is up to you; the more you add, the harder it is to swirl in an aesthetically pleasing manner, but on the other hand, the more Nutella, the more delicious! Drop dollops of Nutella directly onto the surface of the batter with a spoon, then take a knife or a skewer, and give it a couple of swirls. Bake until the cakes are set and pulling away from the edges of the pan slightly; a skewer will come out clean (a few crumbs of Nutella are fine). In the pans I used, the mini cakes took about 15 minutes, the largest pan took about 45.

Sunday, July 17, 2011

CSA Week 5: Jap Chae, Galettes

CSA Week 5-Fruit Share

So, how is your weekend? My Sunday is winding down (waaaaaaah) and it is H-O-T out there! So I'm hiding in my air conditioned apartment, eating watermelon, drinking iced green tea, and generally trying to stretch out my last few hours before the week starts again. This week was apparently the week of abundant fruit at the CSA; a whole load of peaches, plums, and apples (Macintosh, I think). I'm not even kidding, the fruit weighed a whole lot more than the veggies this week, and the peaches and plums have almost displaced watermelon on my "most eaten" list. ALMOST.

CSA Week 5

And here are the veggies: beets, zucchini, yellow squash, collard greens, carrots, cucumber, radishes, turnips, basil, a huge bunch of parsley, and lettuce mix. I roasted the beets and have been eating them tossed with olive oil, a bit of lemon juice, and some goat cheese--delicious! And I used up the beet greens, too, in a big batch of jap chae.

Jap Chae

Jap chae is a Korean dish of sweet potato noodles mixed with veggies and beef and flavored with sesame oil. I dispensed with the beef and used a mix of beet greens, carrots, zucchini, and yellow squash (and a few slices of fish cake). Quick, easy, tasty, and it used up a whole lot of veggies (yay!).

Peaches and plums

I turned one of the peaches and a couple of the plums into some galettes (or tarts, or whatever you want to call them). And actually it turned out to be two peaches that got used in the end, because I must admit, I couldn't resist, er, snacking as I was slicing.

Plum Tarts

I wanted to see how a cornmeal crust would go with the fruits, and while they are not the prettiest looking things ever, I think they match quite well. The plums are especially juicy! Next time, I've got to tweak the filling a bit, and add some flavoring (maybe nutmeg? A little bit of almond? Hm.).

So I've still got collard greens and a huge bunch of parsley. I think I may make chimichurri with the parsley (and freeze it), but I'm really not sure what to do with the collard greens....and egads, it's almost pick-up day again! Better get a move on!

P.S. Bonus picture from a dinner I had with my brother and a friend earlier this week at The Spotted Pig, super yummy ricotta gnudi.

sheep's milk ricotta gnudi @ the spotted pig

Sunday, July 10, 2011

Sour Cherry Cobbler

sour cherry cobbler

So it took me a few days, but I finally figured out what to make with the sour cherries from last week's CSA haul: cobbler! I suppose I could have made pie, but it's a bit hot to be making pie dough. The butter in it would probably have melted before I could get it rolled out, and who wants to eat greasy pie crust? Not this girl. But cobbler is easy to put together, especially when you use a cream biscuit topping (woohoo, no cutting in of butter, just stirring!), and hey, even if it is hot, I can survive turning the oven on for half an hour or so.

Sour cherries

But before I got to that part, I had to pit all the cherries, and man, did that take a long time. I lack a cherry pitter, so made do with a small piping tip, which worked well, but still! It's a lengthy process. And I got cherry juice pretty much everywhere, but at least the juice was clear so didn't stain.

Sour cherry cobbler is love

And here's the cherries all ready for the oven, topped with biscuits. I didn't add much flavoring to the cherries, just some sugar, a splash of almond extract, and a bit of lemon juice (plus instant Clearjel for thickening). It's really amazing how well the almond flavor goes with these cherries! And the flavor definitely is superior to anything I've ever baked with sweet Bing cherries. Very happy with how this came out, and I've got a bunch left (hiding in the freezer so I don't eat it all in one shot)...

It's been a very nice weekend! I had my first pottery class yesterday and made a fish-shaped plate and a cup. I'll have to wait a few weeks to show you the results, but hopefully they will be cool. And then today I had brunch with a friend, followed by some (unsuccessful) shopping, followed by gelato, and then a relaxed evening at home. I wish it was Sunday again tomorrow...

Sour Cherry Cobbler
Filling:
1 quart sour cherries, washed, stemmed, and pitted (make sure you save the juices!)
3/4 cup granulated sugar
juice of 1/2 a lemon
1/2 teaspoon almond extract
2 tablespoons instant Clearjel* or cornstarch

Topping:
1 cup all purpose flour
1/2 teaspoon salt
1 1/2 teaspoons baking powder
1 teaspoon sugar
1/2 cup cream (plus an extra tablespoon or two, if needed)

Preheat oven to 400 F. Stir together the cherries, sugar (use less if you want it very tart), lemon juice, extract, and Clearjel or cornstarch in a medium bowl. Set aside while you prepare the biscuit topping.

Sift together flour, salt, baking powder, and sugar into another bowl. Stir the cream in just until the dough forms clumps. If there are still dry bits, add a bit more cream until you can gather the dough together into a ball. Pat the dough out gently to about 1/2" thick, and then cut out shapes as you like (I used hearts, but you could also just freehand it). Pat the scraps together and cut more shapes out. How many you can fit will depend on your pan dimensions, but any extras can be baked separately.

Turn the cherry filling into an 8" pan (or a pie plate, or whatever pan you have that will hold the filling with a bit of extra space--this would probably have been nice baked in individual cups as wel). Top with your biscuit cut outs. For a prettier finish, brush the biscuits with a bit of cream and then sprinkle with coarse sugar. Bake for approximately 25 minutes, or until the biscuits are golden brown.

This is very important--let this cool a bit. It's hotter than the sun when it first comes out of the oven, and you like the skin inside your mouth, right? Then trust me, and wait. And if you have vanilla ice cream to go with it, bonus!

*Clearjel is modified food starch. I bought mine at King Arthur Flour, but you could substitute cornstarch with no problem.

Sunday, June 12, 2011

When Life Gives You A Strawberry

The Victim

I mentioned a few posts ago that I bought a strawberry plant--and it's been producing strawberries! Hooray! However, there is one problem with only having one strawberry plant--it seems like only one strawberry wants to ripen at any given time. (Okay, it looks like two in that photo, but really only one of them was fully ripe.) So I had a dilemma--if I ever wanted to eat strawberry shortcake, I was either going to have to save and freeze strawberries until I had enough (boo) or I was going to have to make one tiny strawberry shortcake. I bet you can guess what route I took ;) (Also, I have finally named my strawberry plant--meet Margaret!)

Cream Biscuit

I know people have different preferences when it comes to strawberry shortcake, but for me, it's not real shortcake unless it's got a biscuit base. (I mean, not that a cake based one wouldn't be tasty, but it's not the same!) Cream biscuits are great for shortcake and literally take 15 minutes to make from start to finish. You don't even have to cut any butter in, because the only ingredients are flour, salt, baking powder, a pinch of sugar, and heavy cream. Super easy! I cut out rounds with a small cookie cutter; these baked for about 8 minutes. Of course, after they're done baking you have more choices to make--butter or no butter? Sweetened whipped cream or plain whipped cream? Macerate the berries first or not?

wee strawberry shortcake

My choices: no butter, sweetened, not macerated. Mostly because I was in a hurry. And here is my tiny shortcake, just slightly bigger than a quarter. One bite and it's all gone!

strawberries

These are not from my plant, I bought these at the local farmer's market this morning. $7 a quart, can you believe it??? Too expensive for me to make jam from...I'll just enjoy these fresh.