Tuesday, January 27, 2009

CNY Pineapple Tarts, Step-by-step

161

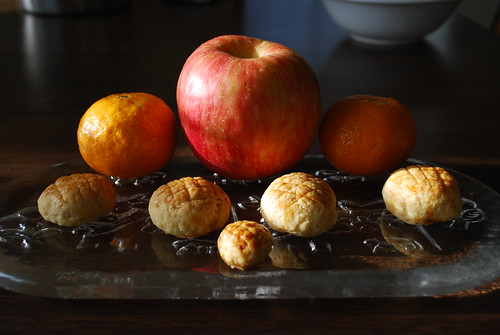
Well, as promised previously, here is an in-detail post on the pineapple tarts I made for Chinese New Year. I think I originally saw a posting on them on Pigpig's Corner and then came across them again in an article in (of all places) the Wall Street Journal. They looked so good--how could I resist?

These types of pineapple tarts (or balls, as I was calling them until someone at work made me start referring to them as tarts) are not a tradition in my family (judging from the blogs I read while looking for recipes, they seem primarily to be popular in Singapore and Malaysia); I've eaten pineapple shortcakes before, but these are totally different in texture. I cobbled a recipe together from various sources, although the pastry dough is primarily taken from Masak-masak's post.

Anyway enough rambling on with the recipe!

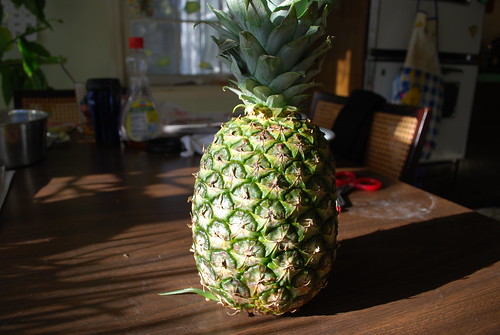
Step 1: Get yourself a pineapple. (See above!)

164

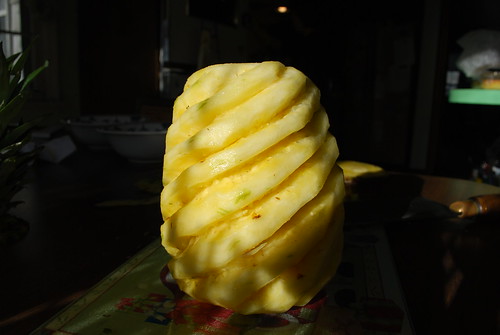
Step 2: Make pineapple naked and remove eyes. I only had a cleaver at my disposal, but I recommend using something smaller, like a paring knife. Remove core, and roughly chop the pineapple into chunks.

165

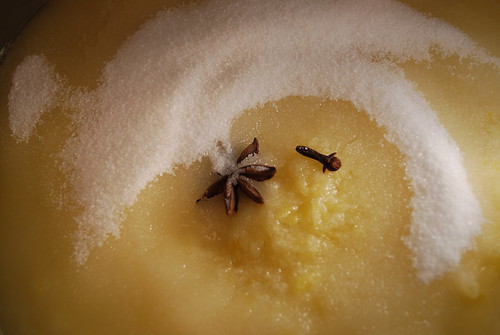
Step 3: Throw pineapple chunks into food processor. Blend until mostly smooth, then transfer puree to a heavy bottomed pot, and add about a cup of sugar, a star anise, and a clove. You may need more or less sugar depending on how sweet your pineapple is. Simmer for a long, long time. A LONG time. Stir frequently. Keep simmering until the puree has turned into an amber, sticky jam.

169

Step 4: After jam has cooled, roll it into balls approximately the size of a marble. Resist the urge to eat the jam straight up.

170

Step 5: Make pastry. (See bottom of post for recipe.) Roll pastry into slightly larger balls. Curse when you realize the number of pineapple balls doesn't correspond with the number of pastry balls.

Step 6: MAGIC. Okay, really, I just didn't take a picture of the filling process because it requires two hands. Basically you want to take your ball of dough, flatten it out with your fingers (try to make the edges thinner and the center thicker, like you would for a dumpling) and then seal a ball of pineapple jam inside. Try to keep the jam on the inside.

173

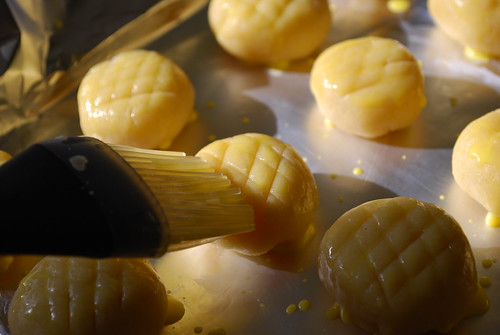
Step 7: If you aren't tired of pineapple tarts, use your knife to score a pattern on top of each one. Brush with an egg yolk glaze. (You should have your oven preheated to 375 degrees F.)

Big pineapple tart and chibi-pineapple tart

Step 8: About 20 minutes later, pineapple tarts! Admire their crackly brown gorgeousness. Resist urge to bite into one immediately, cause that jam gets really hot. Take lots of photos while they cool.

193

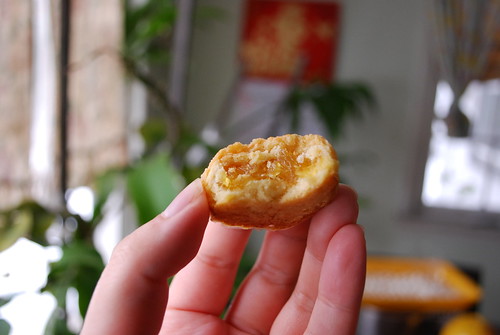
Step 9: Enjoy! Enjoy it fully, because they won't be back for a whole year :)

Pineapple tart dough
3 cups all purpose flour
1/4 cup granulated sugar
1/2 teaspoon salt
2 sticks butter, cold and chopped into chunks
1 whole egg plus 1 egg yolk

Combine flour, sugar, and salt in the bowl of a food processor and pulse briefly to combine. Add cold butter and pulse again until the mixture is the texture of coarse cornmeal. While the machine is running, add in the egg and egg yolk. Pulse until the dough starts to form clumps. Dump onto a clean work surface and knead briefly until smooth.

Monday, January 26, 2009

Gong xi fa cai!

Gong xi fa cai!


It's the first day of the new year (the year of the Ox) and it's bright and sunny and gorgeous out so we are heading down to Chinatown to see some of the festivities--so this is a fly-by posting. More later, including a recipe for these pineapple tarts and a description of our delicious 10 course New Year's Eve dinner.

Xing nian kuai le!

Sunday, January 18, 2009

Late adopter--No Knead Bread

163

Several years ago, I made not making resolutions my resolution for New Year's. (Well, with the exception of my ongoing "be more positive!" drive.) Anyway, I didn't exactly make a resolution this year, but I did kind of vow to get more into yeast baking this year. I'm not really sure why I hadn't been doing any yeast baking at all in the last few years--I guess mostly because of the time factor (I like instant gratification) and the fact that my brother is a very talented bread baker. I mean, why bother when I can eat his delicious roasted tomato focaccia?

Well, be that as it may, what could be a better bread to start off with than the completely no-fuss, completely famous, blogged to death No Knead Bread?* After all, I'm only two years late jumping on the bandwagon. The good thing about being this late to the party is that I had ample evidence that this recipe did, in fact, work--and no kidding! It really is the simplest yeast bread I've ever tried--dump a minimal number of ingredients in a bowl, stir, cover, ignore for the next 20 hours (I stirred it up and let it sit overnight), remember the rising dough somewhere around hour 24, shape (very haphazardly and with great mess), despair over getting it into a ball, fling into hot pan, consign to oven with crossed fingers--and hey, presto! The best textured bread I've ever baked by myself!

169

I mean, look at that slice. It's a far cry from the dense brick that my last loaf of bread turned out to be. And I couldn't believe that it ended up shaped so nicely, despite the fact that I literally just dumped the entire lump of dough into my pan (I just could not get it to form a ball) willy-nilly. The crust is delightfully...crusty, almost shattering when you bite into it, and the interior is nice and tender, but with a nice resistance. Basically, I have no complaints, only praise for this recipe, and if you're just starting to experiment with yeast baking, I highly recommend this.

*Okay, I guess the actual first yeast recipe I made this year was cinnamon rolls, but they were not very pretty.

Saturday, January 17, 2009

Brrrrr....

As Dr. Evil says, "It's frikkin' freezing in here, Mr. Bigglesworth." We are in the middle of a (to my mind) rather severe cold spell; I went to draw the curtains earlier and discovered about an inch of ice on the INSIDE of our windows (well, I guess that proves that we have no insulation to speak of). Brrr. Two hoodies and a blanket on, and I still feel cold.

Anyway, since I haven't exactly had any motivation to go outside I've been doing quite a bit of cooking--attempted to make claypot rice last night but I added too much liquid and so it was more like claypot....mush. Today I made a bunch of scallion pancakes with the intention of freezing them but a certain someone has eaten most of them (okay, okay, I helped too).

Just now, I stirred together my first attempt at the famed No-Knead Bread; we'll see how it's looking tomorrow. Just have to remember to put it somewhere warm....like anywhere that's far away from our windows!

Saturday, January 10, 2009

Green tea shortbread

DSC_0155

Considering that the word "cookie" is actually in the title of my blog, I have not posted much at all about cookies--so, I guess it's fitting that I'm (finally) writing about what I consider to be my "signature" cookie. I mean, if I have to choose a favorite, of course :D Plus, this cookie recipe got me onto the Leonard Lopate Show on WNYC to chat with Leonard and Ruth Reichl during his Christmas cookie show. You can still listen to the clip here, although I sound like a complete dork because I was about to collapse from nervousness. (As an aside, you should all listen to Leonard Lopate. He's great.)

Like all shortbreads, this is a good "keeper" cookie and will remain fresh and delicious for at least 3 weeks, if you keep them in an airtight container. It is very quick to put together and consists of only 5 ingredients; as is true for all shortbreads, using the freshest butter you can find is very important. If you use stale butter, you won't taste anything but the inside of your refrigerator. (Please for the love of all that is delicious, don't use shortening or margarine.)

DSC_0158

Besides the butter, your other most important ingredient is going to be your matcha (also spelled maccha). This is essentially green tea ground into a fine powder and it's sold in Japanese and most Asian groceries; I buy mine at Mitsuwa Market in Edgewater. The current brand I'm using (above) is Yamashiro Ujji Maccha. If you can't find any in your area, then pick a good quality loose leaf green tea and grind it yourself!

I made this batch for my friend Jack's birthday, but as you can see, I snuck a few. One must perform quality control, right?

Matcha Shortbread
2 C all purpose flour
2 Tb good quality green tea powder (matcha)
1/2 tsp fine sea salt
1/2 pound unsalted butter, at room temperature
1/4 C powdered sugar and 1/4 C granulated sugar

Sift flour and green tea into a bowl; set aside. Beat the butter until light and fluffy, about 2 minutes. Sift in the two sugars (and actually you could use all powdered sugar) and salt and continue to beat until well combined and paler in color; this should take another 2 minutes. Add the flour and green tea mixture and mix just until everything is combined and the dough sticks together; don't overmix or you'll have tough cookies. Form the dough into a flat disk, wrap in plastic, and chill for an hour.

Preheat oven to 325 F. Roll the dough out on a lightly floured surface to 1/4" and cut into shapes. Place on a parchment lined cookie sheet and chill until the cookies are firm (15 minutes or so). Bake for 8-10 minutes until the cookies are set; don't let them brown or you'll lose the nice pale green color. Repeat with the remaining dough.

Saturday, January 3, 2009

Knee-deep in macarons

DSC_0130


Happy new year, everyone! I don't know about you, but my resolution this year is to be more regular about blogging. I currently have about 7 drafts sitting in my queue from the end of 2008, so...enough babbling and onwards!

A couple of weeks ago, someone asked me what my "desert island" foods would be--my list went something like pho, tofu, pork chops, cookies (I know, that's cheating), and macarons. So you can imagine my happiness when I got not one but two gifts of macarons!

P1020873

First was this box of chocolate and caramel macarons from Paulette that my coworker Amy carried back from LA for me (also see the top photo). I've been looking for a caramel macaron comparable to the one I had from Laduree since our trip to Paris, and although Paulette's comes close, it's still not quite the same. This is not to say it's not delicious, of course! It was my favorite, and though I gave away a few of the chocolate ones, I hoarded all the caramel ones for myself (shhhh).

P1020888

My second dose of macarons in as many weeks came as a gift from two lovely friends, Tenebrous Kate and the Baron. These are from La Maison du Chocolat, which I blogged about previously. I have to admit, I get kind of a thrill when I see the packaging; yes, I'm still a sucker for nice packaging.

In comparison to the Paulette macarons, La Maison du Chocolat's are significantly larger (about 3" across, I would estimate). I'm not sure what all of the flavors were, but chocolate and raspberry were the predominant flavors I got.

P1020891

And inside a chocolate macaron. To me, the true appeal of the macaron is in the contrasting textures; the crisp shell and the marshmallowy interior, and the even softer filling. Both macarons fit the bill, although if forced to choose, I'd probably have to go with the Paulette macarons....but only if forced.

May 2009 be even more delicious.

Paulette
9466 Charleville Boulevard at Beverly Drive
Beverly Hills, CA 90212

La Maison du Chocolat
30 Rockefeller Center
New York, NY 10020