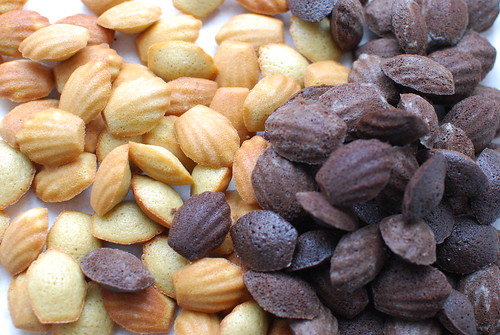
The madeleine, one of baking's enigmas. Is it a cake? Is it a cookie? Is it the mutant offspring of a cake and cookie who got together and made sweet, sweet love?
Haha, okay, enough of that. The madeleine is actually made with what amounts to a cake batter, but is baked in shell-shaped molds so that you get individual, totally addictive little morsels that get a bit crispy and cookie-like on the edges. It's the best of both worlds, in my opinion. (My opinion may be swayed by the fact that I am currently munching on the rejects--cook's treat!) And even more so when they are MINI madeleines.

The easiest way to fill madeleine pans is with a piping bag--that way you can just squeeze the right amount into the impressions rather than messing around with pushing the batter off a spoon or whatever. If you don't have a piping bag, just put your batter into a ziploc bag and cut the corner off. Since this batter rests overnight, I just scraped it into bags and left them in the fridge to chill.

Don't worry too much about spreading the batter out; even though it'll be chilled and stiff, it'll smooth itself out like in the photo above. As you can see, I've filled the molds almost to the rim. Also! I highly highly recommend that even if you have non-stick pans that you still butter and flour them. You will thank me later when you suddenly discover that one of your non-stick pans has mysteriously become a stick pan.

Now what's better than a pile of mini madeleines? These happen to be Earl Grey flavored, and you haven't smelled delicious until you have steeped Earl Grey tea in butter. I wonder if that's what Morrissey had in mind when he sang about sharing greased tea (anytime Morrissey, just give me a call).

Oh wait, maybe this is better--add chocolate to the mix!

From left to right, Earl Grey, chocolate, and traditional. For some reason, the traditional ones turned out very strangely and bubbly (I mean, there were a LOT of air bubbles in the finished madeleines and no humps) and um, ugly. So, those became the bits that I nibbled on, and the much better looking Earl Grey and chocolate ones were packed up and sent on their merry way (their destination being brunch at Fair Folks and a Goat--go see their site, and then make an appointment to visit!)
:Updated on 3/17/10 to include recipe!:
Earl Grey Madeleines (by way of the Washington Post, adapted from Dorie Greenspan)
5 tablespoons unsalted butter, plus more for the pans
2 tablespoons loose Earl Grey tea
3/4 cup flour
1/2 teaspoon baking powder
Pinch salt
1/3 cup sugar
Finely grated zest of 1/2 lemon
2 large eggs, at room temperature
2 tablespoons honey
2 teaspoons vanilla extract
Melt the butter in a small saucepan over low heat or in a microwave oven. Add the tea and allow it to infuse for 15 minutes. Strain and set aside.
Whisk together the flour, baking powder and salt.
Place the sugar and lemon zest in the bowl of a stand mixer or another large bowl and, using your fingertips, work the zest into the sugar until the mixture is fragrant. Add the eggs. Using the stand mixer or an electric hand mixer, beat the eggs, sugar and zest for 2 to 3 minutes, until pale and thick. Add the honey and vanilla extract and beat for 1 minute. Switch to a rubber spatula and gently fold in the dry ingredients. When they are incorporated, fold in the butter. Press a piece of plastic wrap against the surface of the batter and refrigerate for at least 3 hours, or for up to 2 days.
When you're ready to bake, center a rack in the oven; preheat to 400 degrees. Lightly grease 12 full-size madeleine molds, dust the insides with flour and tap out the excess. [Even if you have non stick pans, you should do this in case you end up like me with a pan that has mysteriously lost its non stick abilities. If you are making mini madeleines, just make sure you regrease and flour the pan between batches.] Place the pan on a baking sheet. Pipe or spoon batter into the mold(s), until almost full. Bake for 10 minutes, or until the madeleines are golden and the tops spring back when touched. Remove the pan from the oven and release the madeleines from the mold by rapping the edge of the pan against the counter. Transfer the cookies to a wire rack to cool to just-warm or room temperature.
Makes 12 regular sized madeleines, or something like 40 mini ones.
6 comments:
Thank you for the tips about the pastry bag (why did I never think of this?) and buttering and flouring my non-stick pans. Yes, they are stick pans as it turns out. :-) Recipe, please. In Cuba, we eat a lot of madeleines.
Hi Noble! The pastry bag is my favorite thing for portioning batter (I even use it for muffins these days, hehe). I just can't understand how my nonstick pan could be so sticky!! I will include the recipes later today. Thanks for visiting :)
Lovely images, and I'm sure these were divine! This tutorial may start a dangrous new habit...looking forward to your recipe!
Thanks, bentobird! I just updated it to include the recipe for the Earl Grey madeleines (those being my favorite of the three). The problem with these is that you really should eat them the same day they're made....and I really should not be eating most of a batch in a single day :)
Those madeleines look to die for! Perfect! :D
Thanks Alexandra :D I just wish they stayed fresh longer because then I'd have some to snack on right now!
Post a Comment