Sunday, February 6, 2011

CNY Lunch at Home

Table

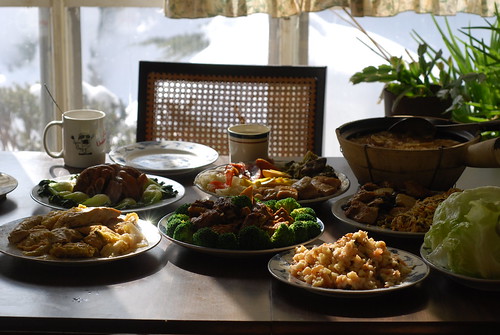
Well, one of the downsides of living in the U.S. is that CNY isn't a holiday! (Although our HK and Singapore business locations are closed, lucky them!) So, we kind of have to celebrate on the days that are convenient--therefore, we had our main CNY meal over the weekend. I seriously think I gained about 3 pounds just from this one meal alone. Just take a look at our groaning board (another advantage to a lunch versus dinner--enough light for good photos! Hehe. You know you have a problem when you try to plan to have food ready when there's still natural light to shoot photos with.) All of this was made by my mom--she's very talented, right?

Cold Plate

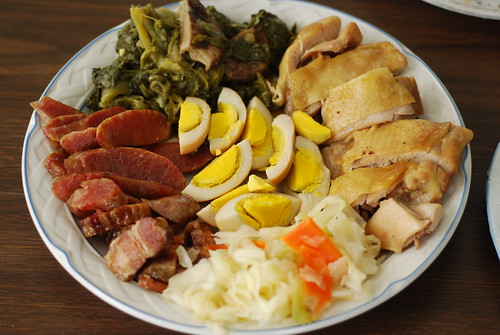
The "cold plate"--I suppose you could call these appetizers? Anyway, clockwise from the top: a type of bitter green cooked with mushrooms, dry-rubbed chicken, cabbage and carrot pickle, waxed meat and Chinese sausages. Braised eggs in the center. Most of these foods are chosen because they are symbols of luck, prosperity, and happiness, although don't ask me which means what. I was too busy stuffing my face to remember :)

Xia Soong

Our other appetizer, stir-fried diced shrimp, water chestnuts, and mushrooms wrapped in lettuce. This is traditionally made with pigeon, but I vastly prefer shrimp (when I think of pigeon, I think of your standard dirty NYC pigeon. Which reminds me, does anyone know why there are so many freaking pigeons on 32nd St. by Penn station? What gives!)

Kao Fu

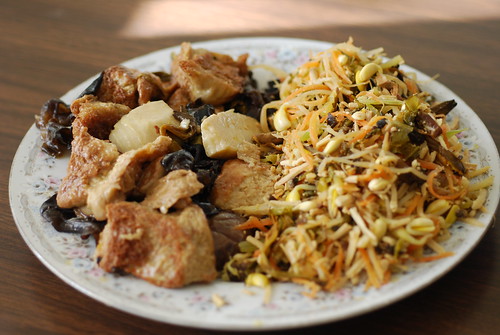
Another cold plate, with kao fu (fried wheat gluten cooked with woodear fungus and bamboo shoots) and a vegetable salad. The kao fu is one of my favorites! I know the description doesn't *sound* that appetizing, but seriously, the chewy wheat gluten and crunchy fungus and bamboo shoots are so good together.

"Egg rolls"

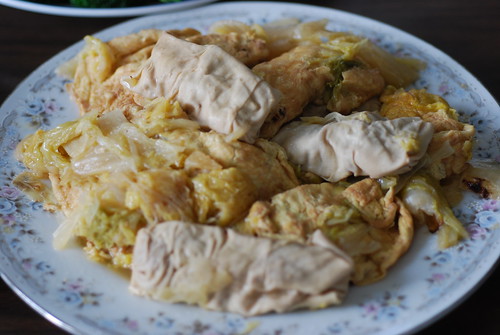
My absolute favorite! These are supposed to look like gold ingots and are egg sheets rolled around a pork filling. Some of them are wrapped in tofu sheets instead, and the whole thing is braised with napa cabbage. I took a huge container of this home with me. So yummy.

Sa Guo Yu Tou

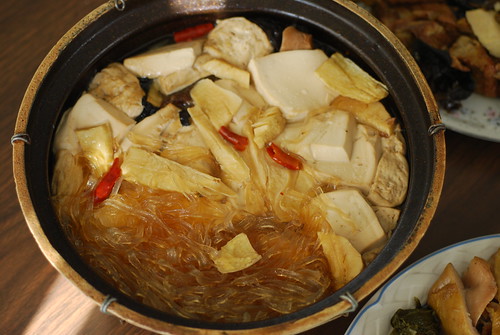
Claypot fish head soup! The fish head is underneath the other goodies (tofu, glass noodles, veggies, and chilis) and was really, really good. Fish cheeks, yum. This would not have made good leftovers, so I did not get to bring any of this home :(. The noodles soaked up all the flavor of the soup and were soooooo yummy.

Hong Shao Ti Pong

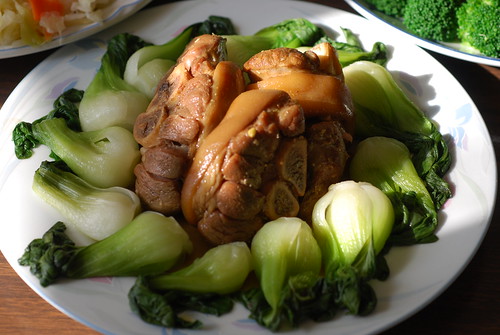
Nice plating, huh? These are "red-cooked" (braised in soy sauce) pig trotters. Like any long-cooked, braised dish, the meat was super tender. Great to eat with rice, although we totally forgot that there was rice because there was so much other food. And the bok choy was good for fiber :) This is also the sauce that the eggs from the cold plate were cooked in.

Braised pork ribs

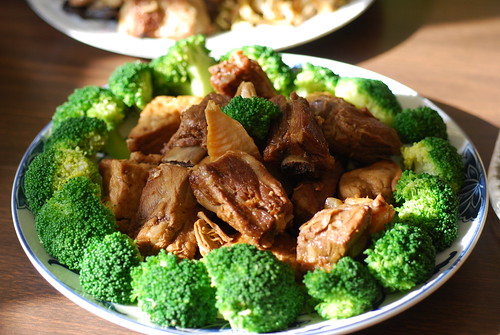
And last, but not least, braised pork ribs, thick fried tofu, and bamboo shoots. Another good-with-rice dish. I should have brought more of this home, I loooooooove fried tofu.

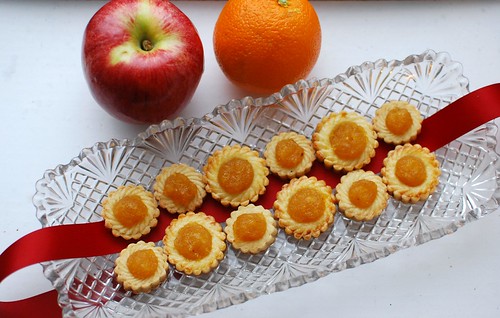
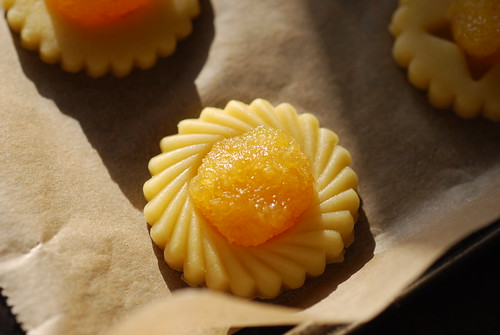
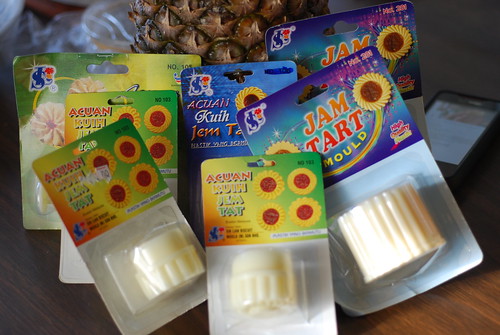
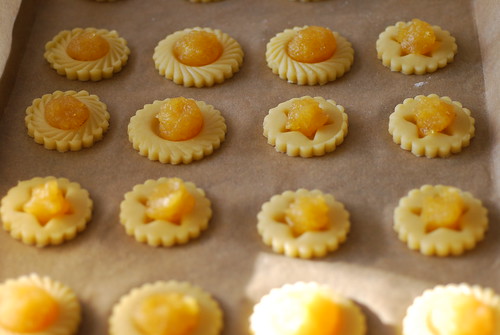
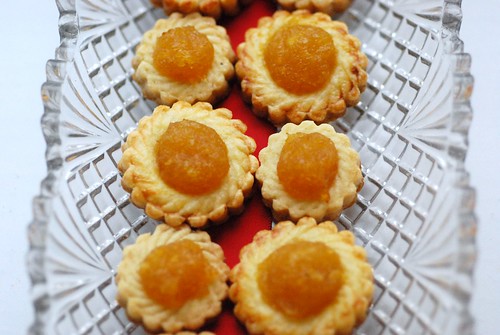
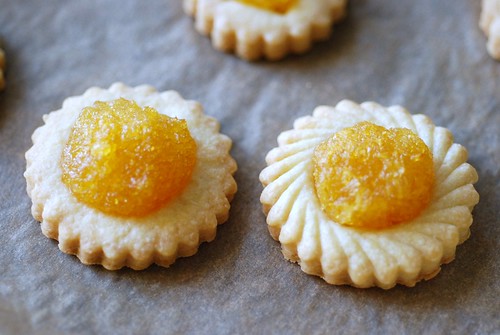
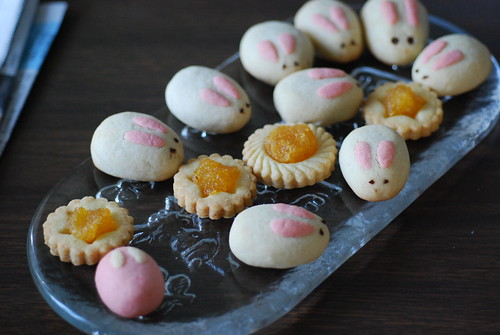
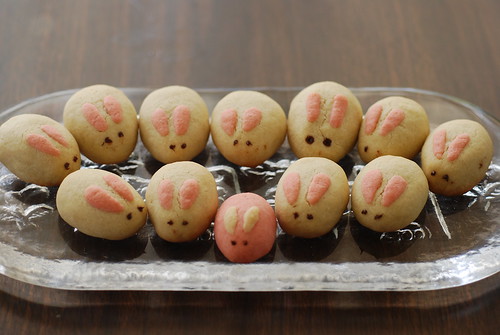
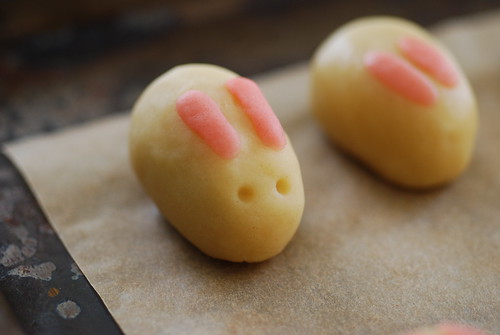
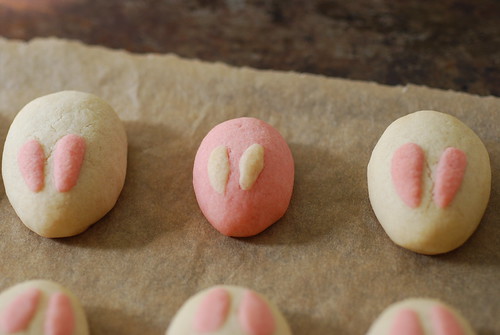
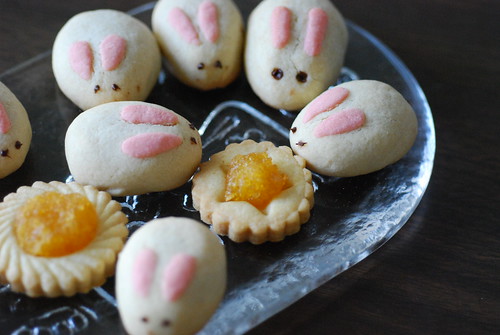
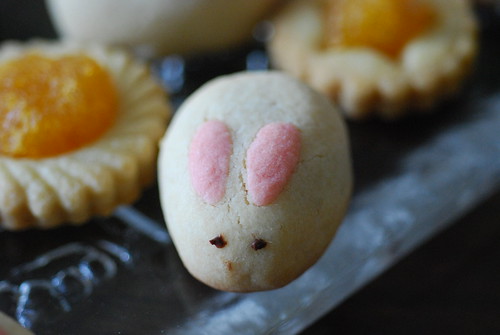
Can you imagine that after all this, we still had room for dessert? Well, a few hours later anyway ;) We had bunny cookies, pineapple tarts, and jiu niang yuanzi dan. I don't know how to translate that, exactly, but it's a sweet dessert soup made with fermented (and slightly alcoholic) sweet rice, with dumplings, fruit, and egg in it. It probably sounds crazy to you if you haven't tried it, but it's delicious and winy and totally warming. Unfortunately I forgot to take a photo of it, but next time I'm home, I will demand some and take a picture then. Oh, and of course, lots of nian gao (sticky rice cake) to snack on. You can check out this post from last year for photos of nian gao and a recipe to make the coconut type.

Well, I think that's the end of my CNY posts! The food is gone, but at least the memories (and photos!) are still there :)

Wednesday, February 2, 2011

More Baking for Chinese New Year

DSC_1329

Woohoo, only one more day until Chinese New Year! I had dinner with some of my girl friends last night to celebrate and gave them each a box of bunny cookies. Haha, I wish I had taken a picture, but one of them started petting the bunny. I think she might just keep it on her desk and not eat it :D I also included some pineapple tarts, and that's what I'm going to talk about today!

DSC_1261

The first step to making pineapple tarts is to get a pineapple. I admit, I didn't look very hard, but I don't know if you can find ready-made pineapple jam in the supermarket. Anyway, I actually like making jam; even if it does take a fair amount of time, it's very simple. Peel your pineapple, remove the eyes, chop roughly, and then puree in a food processor (or a blender, or grate by hand). Pour the puree into a heavy-bottomed saucepan and add one clove, one star anise, and 1/2 to 1 cup of sugar, depending on how tart your pineapple is. Boil over medium low heat until it turns a dark amber color and is thick and sticky; oh, hey, you can go and look at the post I made about pineapple tarts two years ago to see what the jam should look like. Scrape into a bowl and refrigerate. You can do this a few days in advance.

DSC_1315

The next thing is, decide whether you want to make closed (see post linked above) or open tarts. I had shamelessly asked my friend Kaimono if she would send me some pineapple tart molds so I went with open face! I like this style because you can see the yummy jam, and because I like the design of the cookie molds.

DSC_1259

Look how many she sent! There are different sizes and patterns. Thank you, thank you!! :D I can tell I'm going to be using these for lots of cookie baking in the future, and not just pineapple tarts! Oh, and in case you're curious how they work, the cutters are in two pieces, one to cut the actual cookie, and then an inner piece that stamps the pattern and makes a well for the jam. Just make sure you roll your dough thick enough to accommodate a well (for these molds, I rolled dough to 1/4").

DSC_1316

Roll your pineapple jam into balls and place one in each well. I guess you don't actually have to roll them into balls and could just scoop it with a small spoon or pipe it, but I like them to be neat! Plus then you get to lick your jammy fingers.

DSC_1333

Before baking, you can glaze the cookies with an egg yolk-water glaze, or leave them plain. The ones above are glazed. (Aren't the tiny ones cute?)

DSC_1318

And these are unglazed. I think I prefer them unglazed, actually, seems to make the pattern easier to see!

Okay, well we are in the midst of an ice storm, so I'm going to sign off and attempt to make it to work. One more post on CNY tomorrow :D Gong xi fa cai and xing nian kuai le to those of you who are ahead of U.S. time :D

Sunday, January 30, 2011

Baking for Chinese New Year

DSC_1321

It's almost time for Chinese New Year, woohoo! Actually, it's kind of disappointing because I'll be at work on the day itself as it isn't a holiday here--hm, just once I'd like to experience CNY in Taiwan or Hong Kong, because I bet it's totally insane. Anyway, we had our CNY "eve" dinner early this weekend since we won't be able to do it midweek, but that'll be fodder for another post! In this one, we're gonna talk about baking for CNY! As you can see from the top photo, this year we're having bunny cookies and pineapple tarts. Why bunny shaped? Well, because it's the year of the Rabbit! Fitting, right? (I better not make this a tradition though, or else I'm going to have a real challenge when the year of the dragon rolls around...)

DSC_1291

What do you think, threatening or cute? I mean, all those eyes, staring at you without blinking...

DSC_1262

Actually, baking cookies for CNY is not a tradition in my family (although of course, we do have traditional foods). I started making pineapple tarts a couple of years ago after seeing them on other people's food blogs and reading an article about them in the newspaper. This year, my friend Kaimono from Gastronomy Hut was super awesome and sent me some cookie molds for making pineapple tarts, so of course I made those (and they will be featured in another post). But I also was inspired by some bunny shaped wagashi that I saw a few months ago and thought that they could be reproduced in cookie form.

DSC_1266

Shaping these is actually really easy--you just roll tablespoons of dough into oval-ish shapes that are fatter at one end. It's the ears that take a long time, and as you can see, mine are all different. That's cool, they're all individuals! Also, I do not recommend actually poking eyeholes in your bunny like I did on one--just pipe or dab the eyes on after baking.

DSC_1274

Here are the cookies after baking, but before they got faces. I didn't realize how little dough the ears would take, so I had some extra pink which got turned into smaller bunnies. They're special!

DSC_1322

And now they're all busy munching on pineapple tarts. Mm, pineapple tarts.

DSC_1323

Well hello, Mr. Bunny--you're almost too cute to eat. Almost. Now the question is--head or butt first?!

Year-of-the-Rabbit Cookies
3 cups all purpose flour
1/4 teaspoon salt
1 cup (2 sticks) butter, room temperature
3/4 cup sugar
1 egg
1 teaspoon vanilla
red or pink food dye
small handful chocolate chips (or chopped chocolate)

Sift flour and salt together into a medium bowl and set aside. Beat butter and sugar together until fluffy. Beat in egg and vanilla until mixture is smooth. With your mixer on low speed, add the flour mixture in and mix just until the flour is incorporated. It's okay if the dough isn't totally cohesive at this point; turn the dough out and knead briefly until smooth. Pinch off a ball of dough about the size of a walnut--this is the dough you'll use to make ears. If you also want to make some pink bunnies, then break off a bigger piece of dough--it's totally up to you. Use a toothpick and add a drop of dye to your small piece of dough and knead in until the color is even (you should probably not do this on a white counter). For my amount of dough, a drop was enough to get the shade of pink I wanted, but you can adjust. Heck, you can give your bunny blue ears if you want, I won't stop you (but I will look at you funny!). This dough is quite firm, so you can start shaping it right away, but if you find it's too sticky or soft to work with, stash it in the fridge for an hour or so.

Break off roughly tablespoon-sized pieces of dough and roll into a smooth, pear-ish oval-ish shape. (See photos above for reference.) When you have all of the dough shaped, take your pink (or blue!) dough, pinch off tiny amounts (seriously, REALLY tiny amounts) and roll into a "rope" shape. The easiest way I found to do this was just to roll the dough against my palm with a finger. Position one on top of your bunny and press down gently. Repeat for the other ear. It may take you a few tries to get ears that you're happy with, but hey, I think all the lopsided ears add character.

Place cookies on a parchment lined baking sheet and refrigerate while preheating your oven to 350 F. Bake for 15-18 minutes, or until the bottoms are lightly browned and the cookies feel set. The tops won't brown much, if at all. Let cool completely before piping faces. You can make noses, whiskers, etc. but I kind of like the minimalist dots for eyes, which I just made by melting some chocolate and using a toothpick to dot them on. Set aside until the chocolate is set.

Makes approximately 40 bunnies to bring you luck in the new year!

Sunday, January 23, 2011

Best vanilla cupcake? (and a birthday!)

DSC_1242

I have a couple of chocolate cake/cupcake recipes that I'm very happy with, but I'm still on a quest for an ideal vanilla cupcake. I don't know what it is exactly that makes this a difficult search, but somehow, I have yet to find a perfect vanilla cupcake recipe. They're always either too dry, or too sweet, and above all, not vanilla-ey enough. And it's not as simple as doubling the amount of vanilla extract, either (then it's too one-dimensional). I should probably try getting some vanilla beans and see if that makes a difference (although that would make vanilla cupcakes rather expensive, sigh). Anyway, the latest recipe on the testing block is from Martha Stewart and I picked it because it calls for sour cream, which I figured would take care of the dryness problem (and also because I had bought some for potato salad). It was in fact a nice, moist cupcake with a good rise, and it was really good right out of the oven. I'm not as crazy about the texture after it cools though. To be fair, we are having a cold snap here, and I cooled the cupcakes on my windowsill, which is probably close to freezing point (my windows have actually frozen over! Brrr.) so I'm sure that didn't help the texture! Anyway, it's a decent cake, but the search continues.

DSC_1240

The frosting is my old standby from King Arthur Flour (you can find the recipe here) and is my all time favorite (and I'm not even a big frosting fan!). Plus, it's made with cocoa, which I always have on hand. And since these were for a birthday, I decided to forgo my usual restraint (haha) and showered them with sprinkles.

IMAG0032

Here's the birthday girl! We used to work together and now that I'm working elsewhere, I don't see her as often as I used to, but we had a fun time catching up (and I got to see her adorable kids and chat with her husband). I wish I had thought to bring my actual camera with me, but this crappy phone image will have to suffice--please pay special attention to her awesome gingerbread house which has lighting! And windows made out of butterscotch candies. I think the inhabitants were My Little Ponys, but they must have been out when I visited. Oh, and that blur in the corner is her younger kiddo, who was starting to resemble a Na'avi when I left. Heehee.

Anyway, I hope she had a good birthday, and we have plans to go to Dinosaur BBQ soon, woohoo!

And finally, a request--does anyone have a vanilla cupcake recipe they love? Please send it to me!

Wednesday, January 19, 2011

Souvenirs from Taiwan

Flower paper mochi

We are supposed to have another snow storm Friday--geez! We've had snow I think pretty much every week since Christmas. Can spring arrive already? I'm tired of winter fruit!

Okay, enough complaining. My mom just came back from Taiwan and brought back lots of edible things (as usual), and I took pictures of some of the prettier things. Like those gorgeously wrapped sweets above! They're from a company called Awon and the only English on the packaging says "flower paper mochi", which I suppose is pretty accurate.

Cherry mochi

There are two flavors, green tea and cherry. So far I've only tried the cherry, but it is really good! Nice and tart, and surprisingly fresh for packaged mochi. I wish I had taken more than these two with me....(save me some okay?!)

Cheese wrapped marble cake

But my favorite is this cake! It looks like a boring old marble cake, right? But it's very spongey and light and moist all at once (it's somewhere between poundcake and sponge cake in terms of density) AND it's wrapped in a thin layer of flaky cheese pastry. I know, that sounds crazy, but it works. I wish I had taken a photo of the box it came in because it has the cutest cow logo. I am saving and eating this cake very slowly to make it last.

Indigo horse

And finally, this cute horse from China, made out of traditionally dyed cloth. (I'm a Horse, according to the Chinese zodiac.) This will be going on my desk at work! I got some other cool little gifties, like a Hello Kitty pouch and a dress and a bottle opener, but you're just going to have to imagine those :)

Hope all of your weeks are going well!

Saturday, January 15, 2011

Domokun Cookies

Domo!

So, how is 2011 treating everyone? So far, it's been pretty snowy here and now it's also freaking freezing (and unusually cold in my apartment, time to call the super AGAIN), but otherwise, it's not been a bad start. For one thing, I am sticking to my resolution to eat more veggies, and I've even managed to start packing lunch again (well, except those days where I hit the "off" button instead of "snooze" on my alarm clock). And it's a long weekend, woo! So it's a perfect opportunity to do some baking. I don't know about you, but I have this problem where every time I browse foodblogs, I end up craving pretty much everything I see. I've got a list of recipes bookmarked that could probably keep me busy for an entire year. But somehow, things like Domokun cookies seem to go straight to the top of the list. By the way, please go to Diamonds for Dessert for the original (and excellent) tutorial, because her cookies look at least 1000 times better than mine do. That's what happens when you are too lazy to actually find a ruler!

Faceless!

This is really the first day I've worked with making patterns in cookie dough, and I learned that yes, you really do have to measure and make everything neat and straight, or else it comes out all wonky. Oh well, for a first try, I think they are okay! Of course, the proportions are wrong and next time I'll have to make sure I make the red portion smaller. These are just gonna be extra loud-mouthed Domokuns ;)

Piping practice

You can also see that my piping skills leave something to be desired. Ahem. (Might try royal icing next time, white chocolate is a bit temperamental.)

giant mouthed domokun

But I think this one is my best one (which is not saying much, haha). Yes little Domokun...it makes me happy to look at you. Now I have to go buy some milk so I can eat a few (don't tell them!).

Wednesday, January 5, 2011

Resolutions

Ugly pudding

Happy new year! How did you celebrate? We started things off with prosecco and ichigo-shu (so yummy) and then spent the rest of the night at a friend's place, nice and low-key, just how I like my NYEs! I'm not big on resolutions, but I did make a few this year--eat more vegetables, procrastinate less, be less grumpy. And I will take my additional vegetables in any form I can get, so I think that this pumpkin flan qualifies for my first resolution VERY WELL, THANK YOU!

I was trying to reproduce a pumpkin pudding I'd had before at a Japanese restaurant in midtown (Katsu-Hama, actually. One of the things I miss about midtown)--there, it comes in a wedge and is a fairly firm textured but very smooth pudding. I think they might actually use kabocha squash (the texture of kabocha puree is drier, which might account for why their pudding was so firm and mine was so collapse-y) versus the canned pumpkin puree that I used. I used this recipe from Tales from a Tokyo Kitchen (a great blog!) and baked mine in a bain marie instead of steaming. Also, I had to use a variety of molds as I (shockingly) do not own any actual pudding cups. I ended up using two small bowls, a mini milk bottle, and a canning jar:

More ugly pudding

Actually, because the pudding was so soft, the jar kind of worked out well! No worries about turning it out, just make sure you scoop all the way down to get the caramel sauce. I definitely need to experiment with this a bit, because the texture of my pudding was not smooth enough and had lots of air bubbles in it (I'm guessing temperature too high; maybe I will try to work out a steaming device next time). Be that as it may, it certainly TASTED very close to what I was trying to recreate! And I love the caramel sauce, although it's hard to watch it caramelize based on color because of the maple syrup. Anyway, it was good enough for a first try, especially since I've been sick for the last 3 days; I am so sick of tea and SO HAPPY to eat something that's not congee!

Anyhow, so next time--kabocha squash, steam vs. bake, and strain strain strain!